Use the Devices screen to configure how your user-facing Catalog App appears on each of your devices.
To access the Devices screen, log into my.catalogkiosk.com and click Devices in the navigation bar located at the top of the screen.

Manage Devices
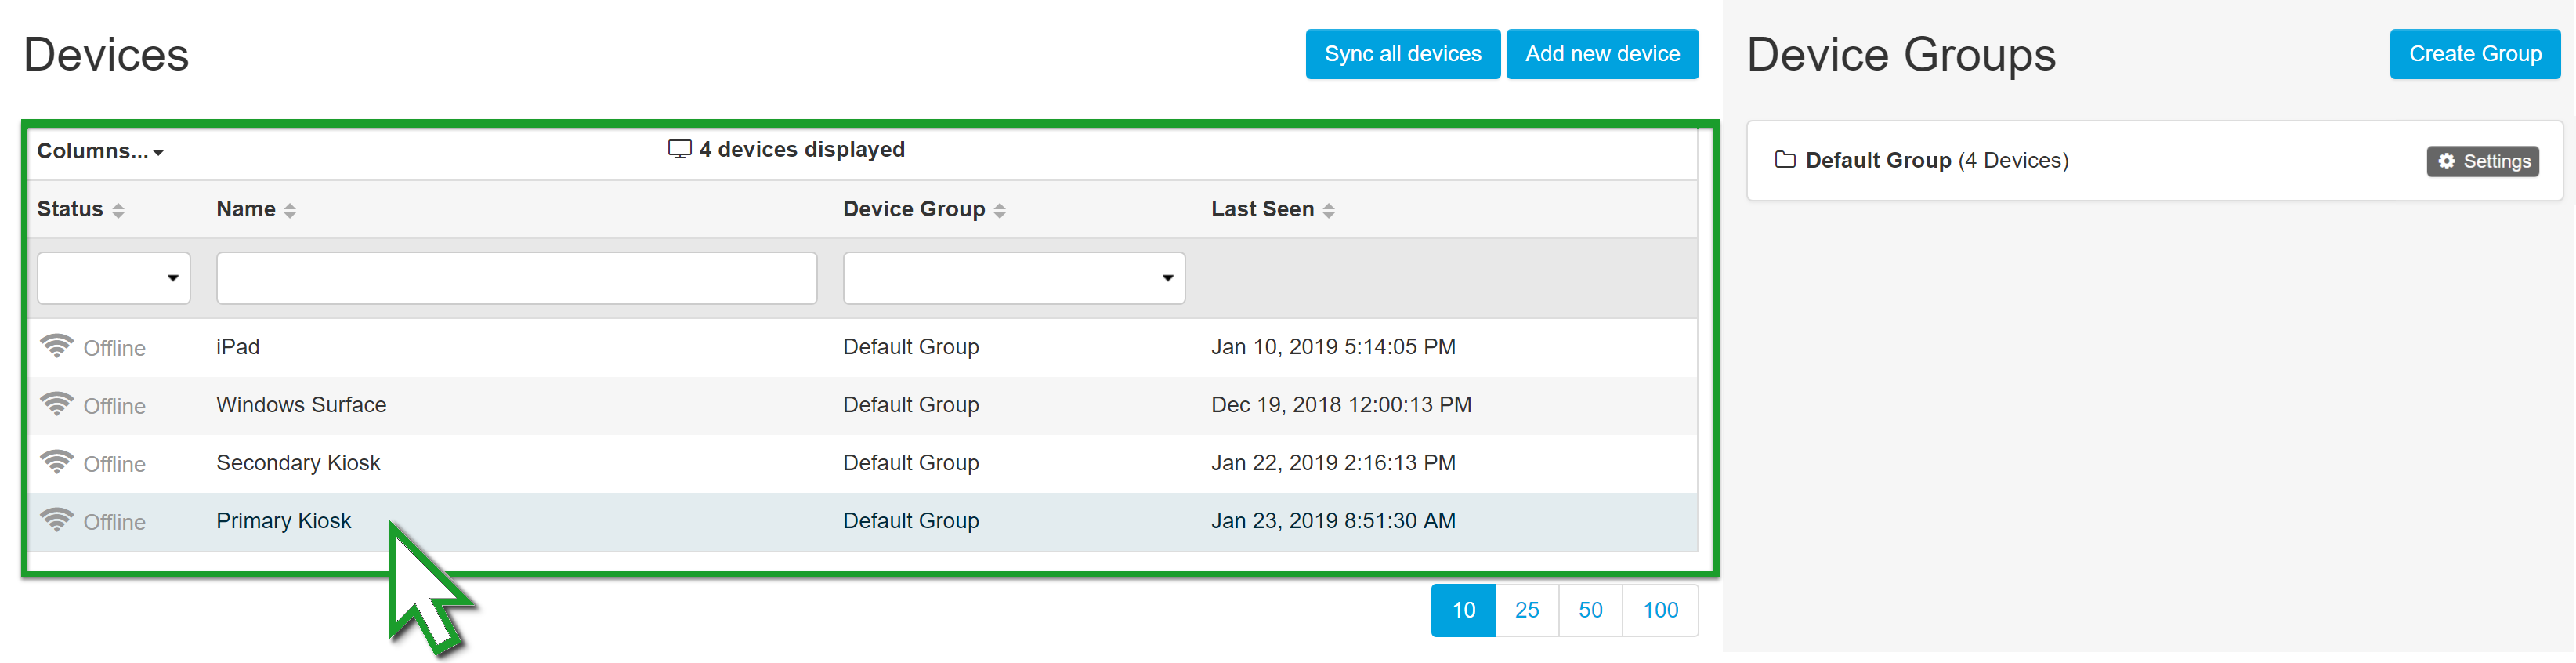
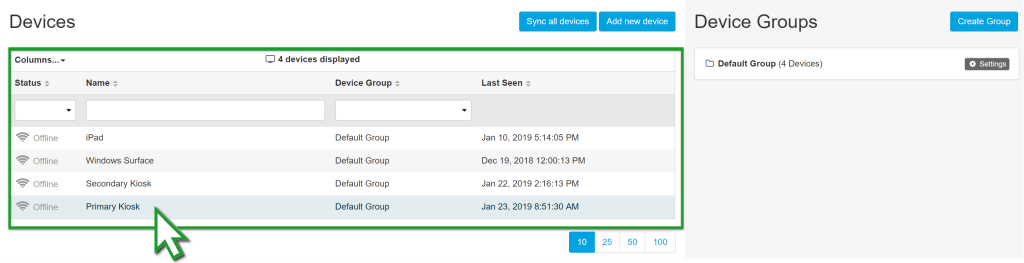
The Devices screen allows you to manage every device connected to your Catalog App Manager from one convenient location. The left side of this screen displays a list of all devices connected to your account.

This list includes the name of each device, whether it is online or offline, and which device group it is assigned to. Use the search fields above each column to filter devices by Status, Name, or Device Group.
Add a New Device
- Log in to my.catalogkiosk.com.
- Click Devices in the top navigation.
- Click Add New Device to add a new device to your account. This is where you will enter the pairing code for your device and select the device group from which to inherit settings.
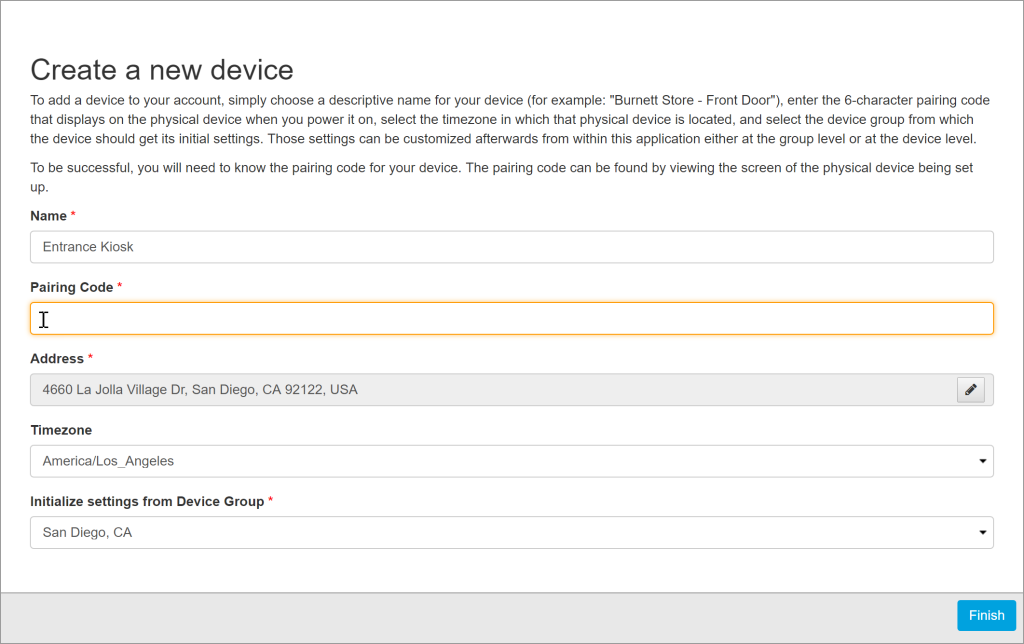

Learn more about installing and pairing the Catalog App.
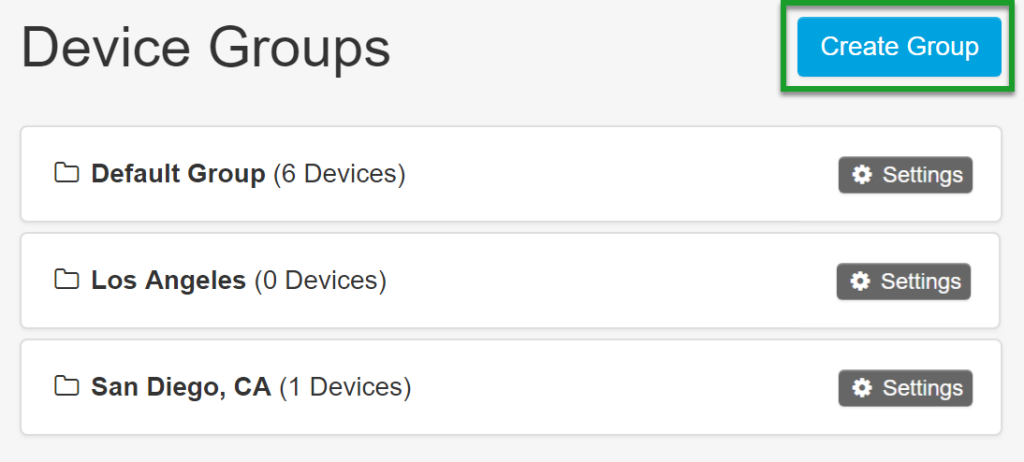
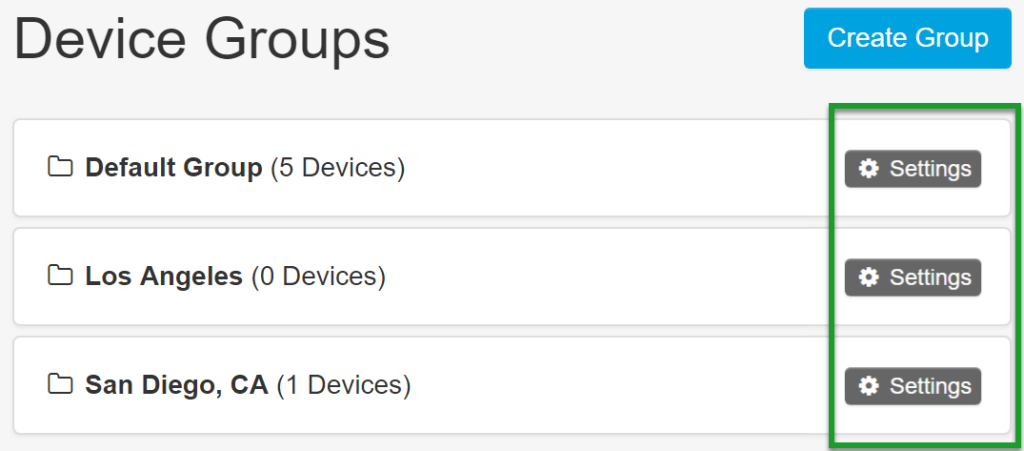
Manage Device Groups
- Log in to my.catalogkiosk.com.
- Click Devices in the top navigation.
- The right side of the Devices screen displays a list of device groups.


A device group allows you to apply the same customization settings to a group of devices. Account administrators can create as many device groups as needed for the management of an account.
When you first log in to your Catalog App Manager and navigate to the Devices screen, you will notice that a default device group is already established for you.
Groups are also an effective way to manage devices in multiple stores from one central account. Simply create a device group for each store location to easily apply the same settings to all devices in a store.
For simplicity, we recommend you edit settings on the device group level whenever possible. On a individual device's settings page, click Go to Group Settings to edit the device's group settings instead.

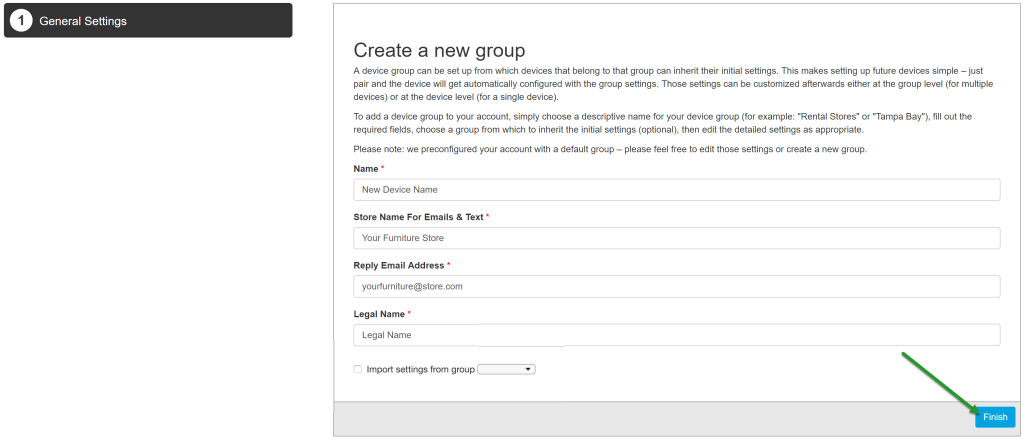
Add a New Group
To add a new device group:
- Log in to my.catalogkiosk.com.
- Click Devices in the top navigation.
- Click Create Group to the right of the Device Groups heading.
- Enter the information for your new device group, then click Finish.


Customize Device Group Settings
- Log in to my.catalogkiosk.com.
- Click Devices in the top navigation.
- To customize a device group, click the Settings icon to the right of the device group name.
The settings screen contains all customizable settings in one convenient location.
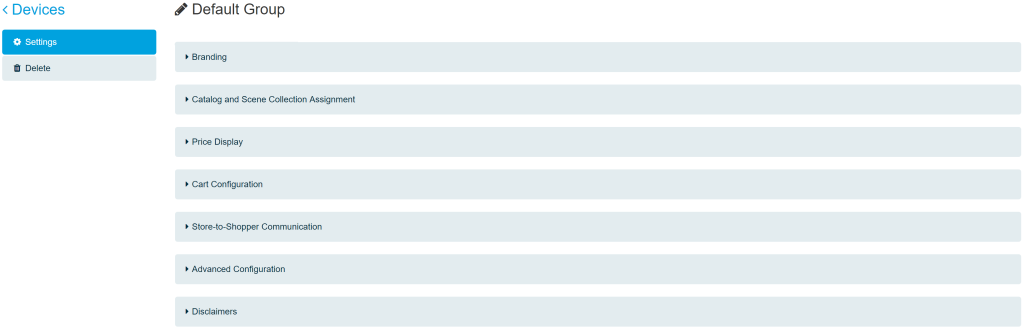


 Branding
Customize the Attractor Screen
When your customers approach your in-store kiosk, they are first met by the Catalog App's Attractor Screen. The attractor screen is meant to grab the attention of customers and invite them to explore the catalog. Customers simply have to tap on the screen to enter the Catalog App.
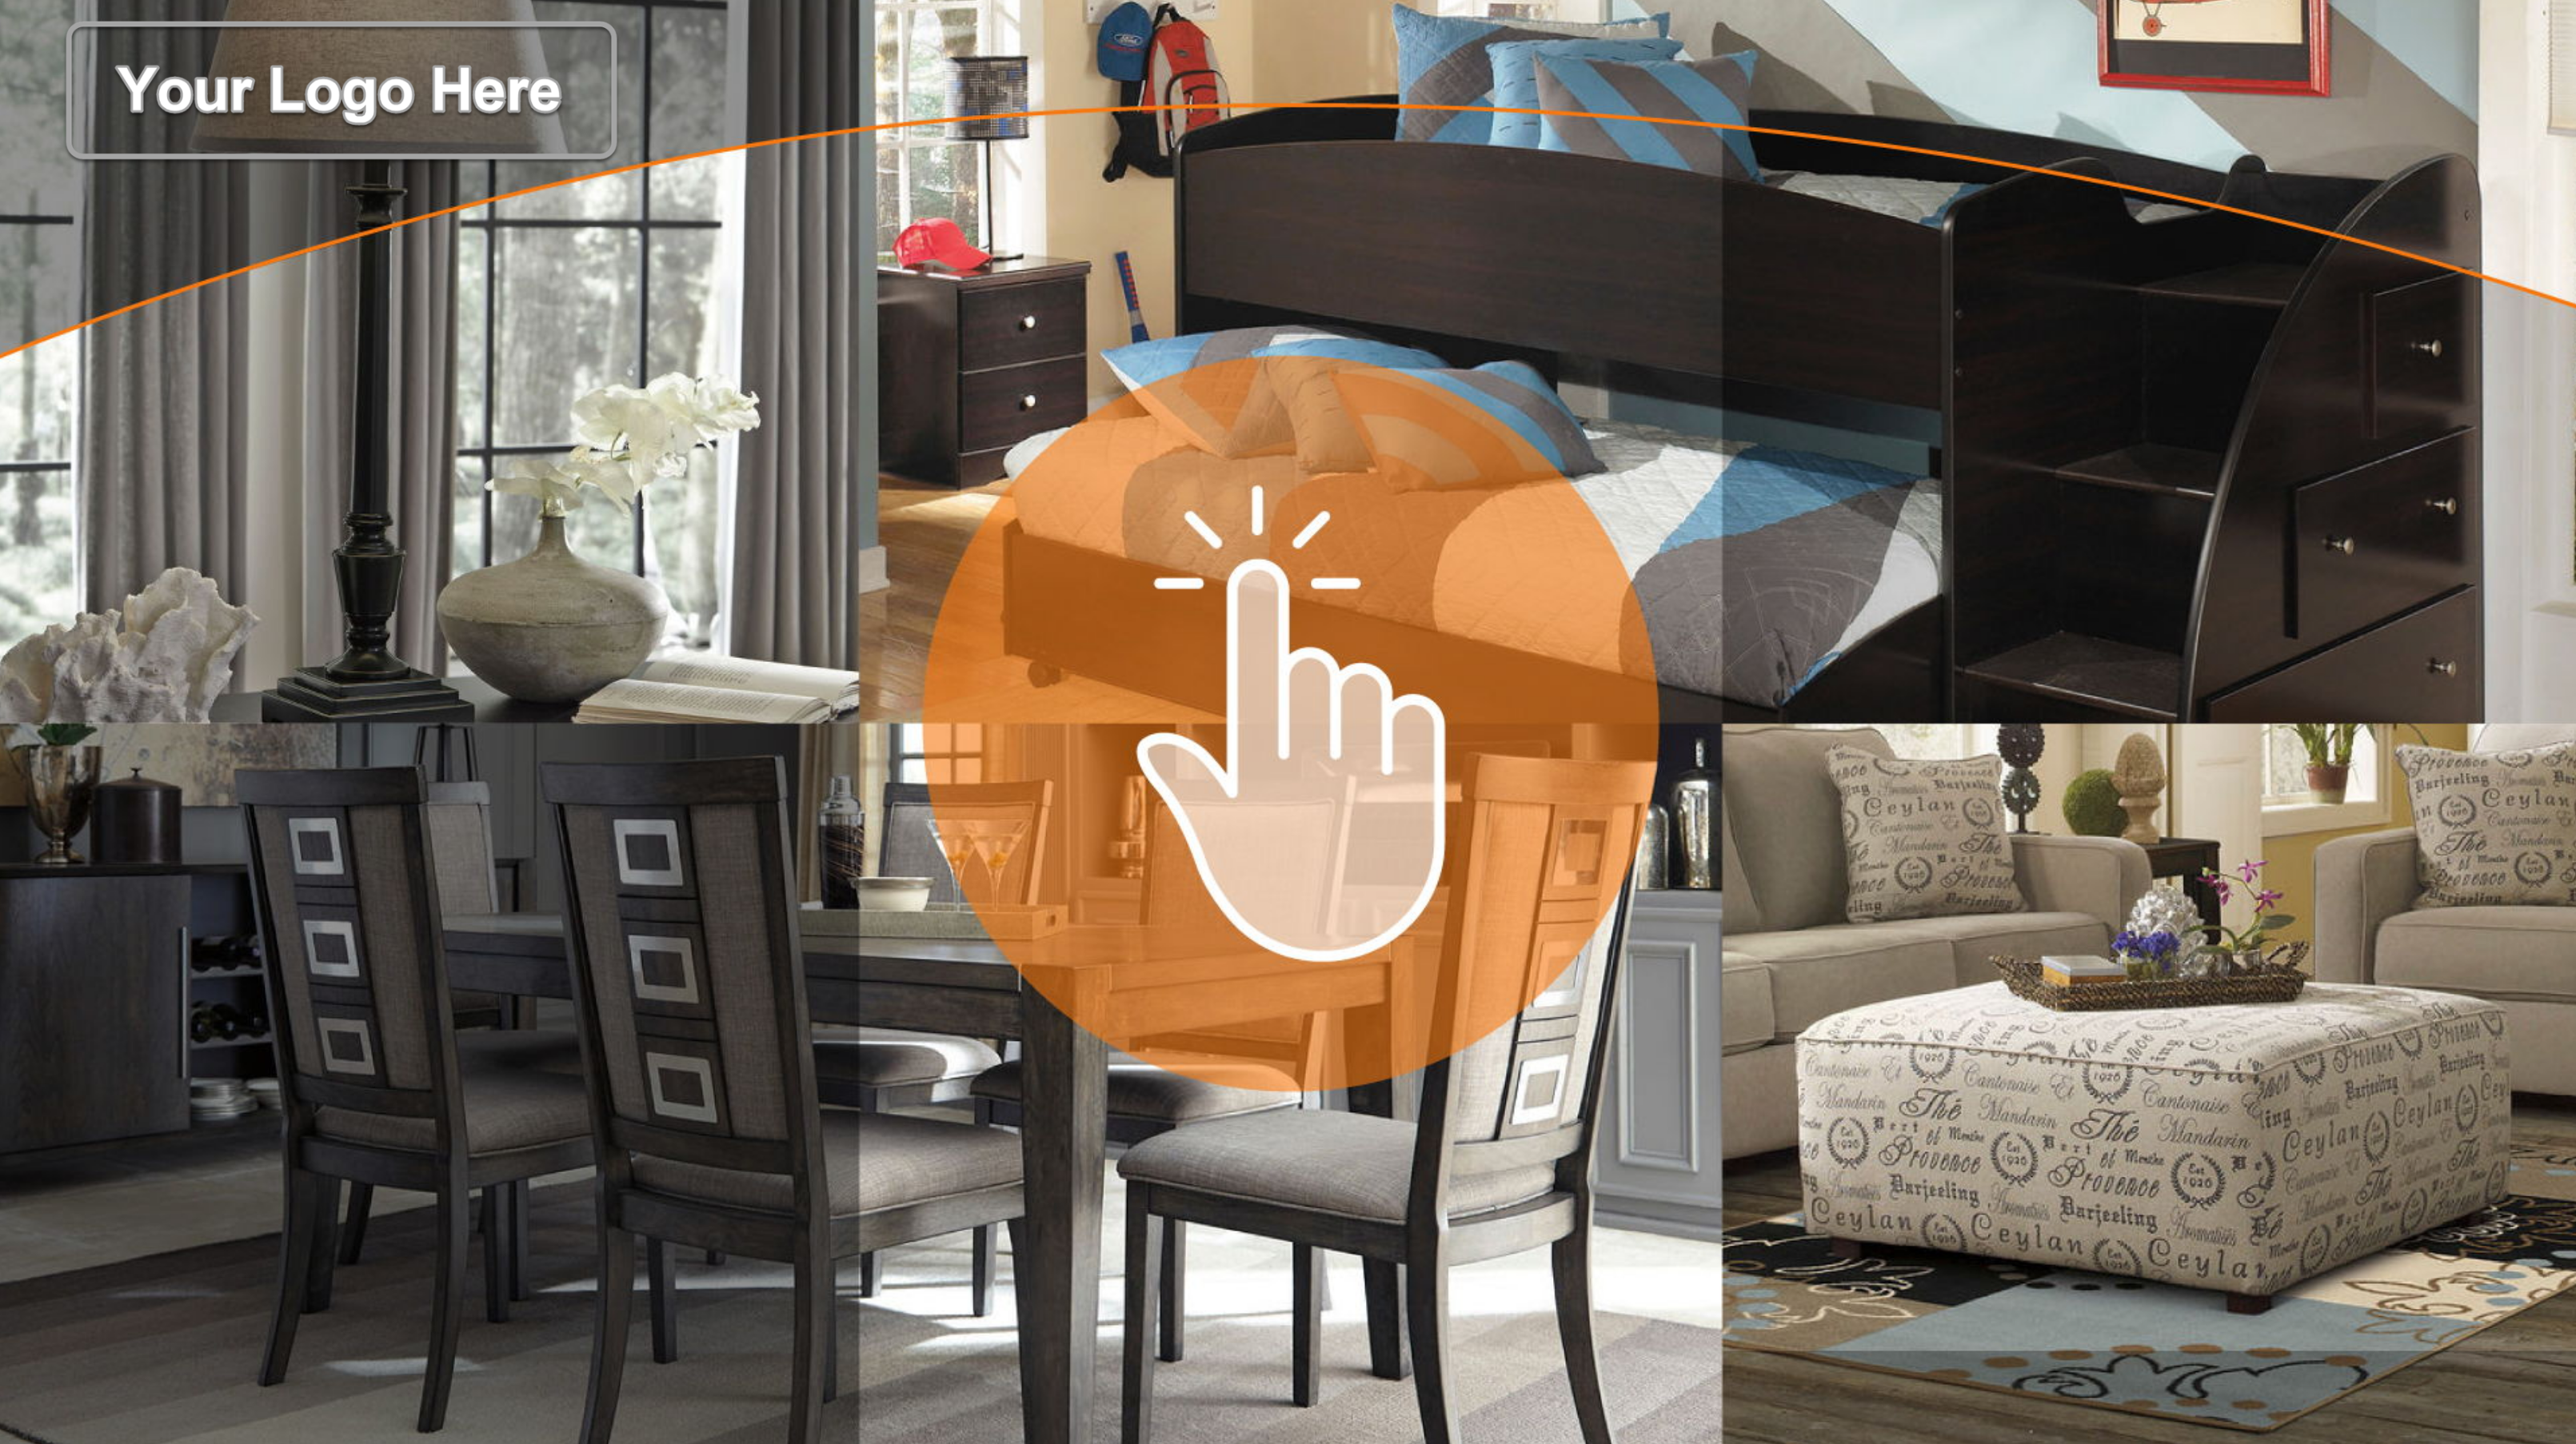
There are four designs to choose from. Select a thumbnail under the "Available Attractor Screens" heading, and click Save Changes.
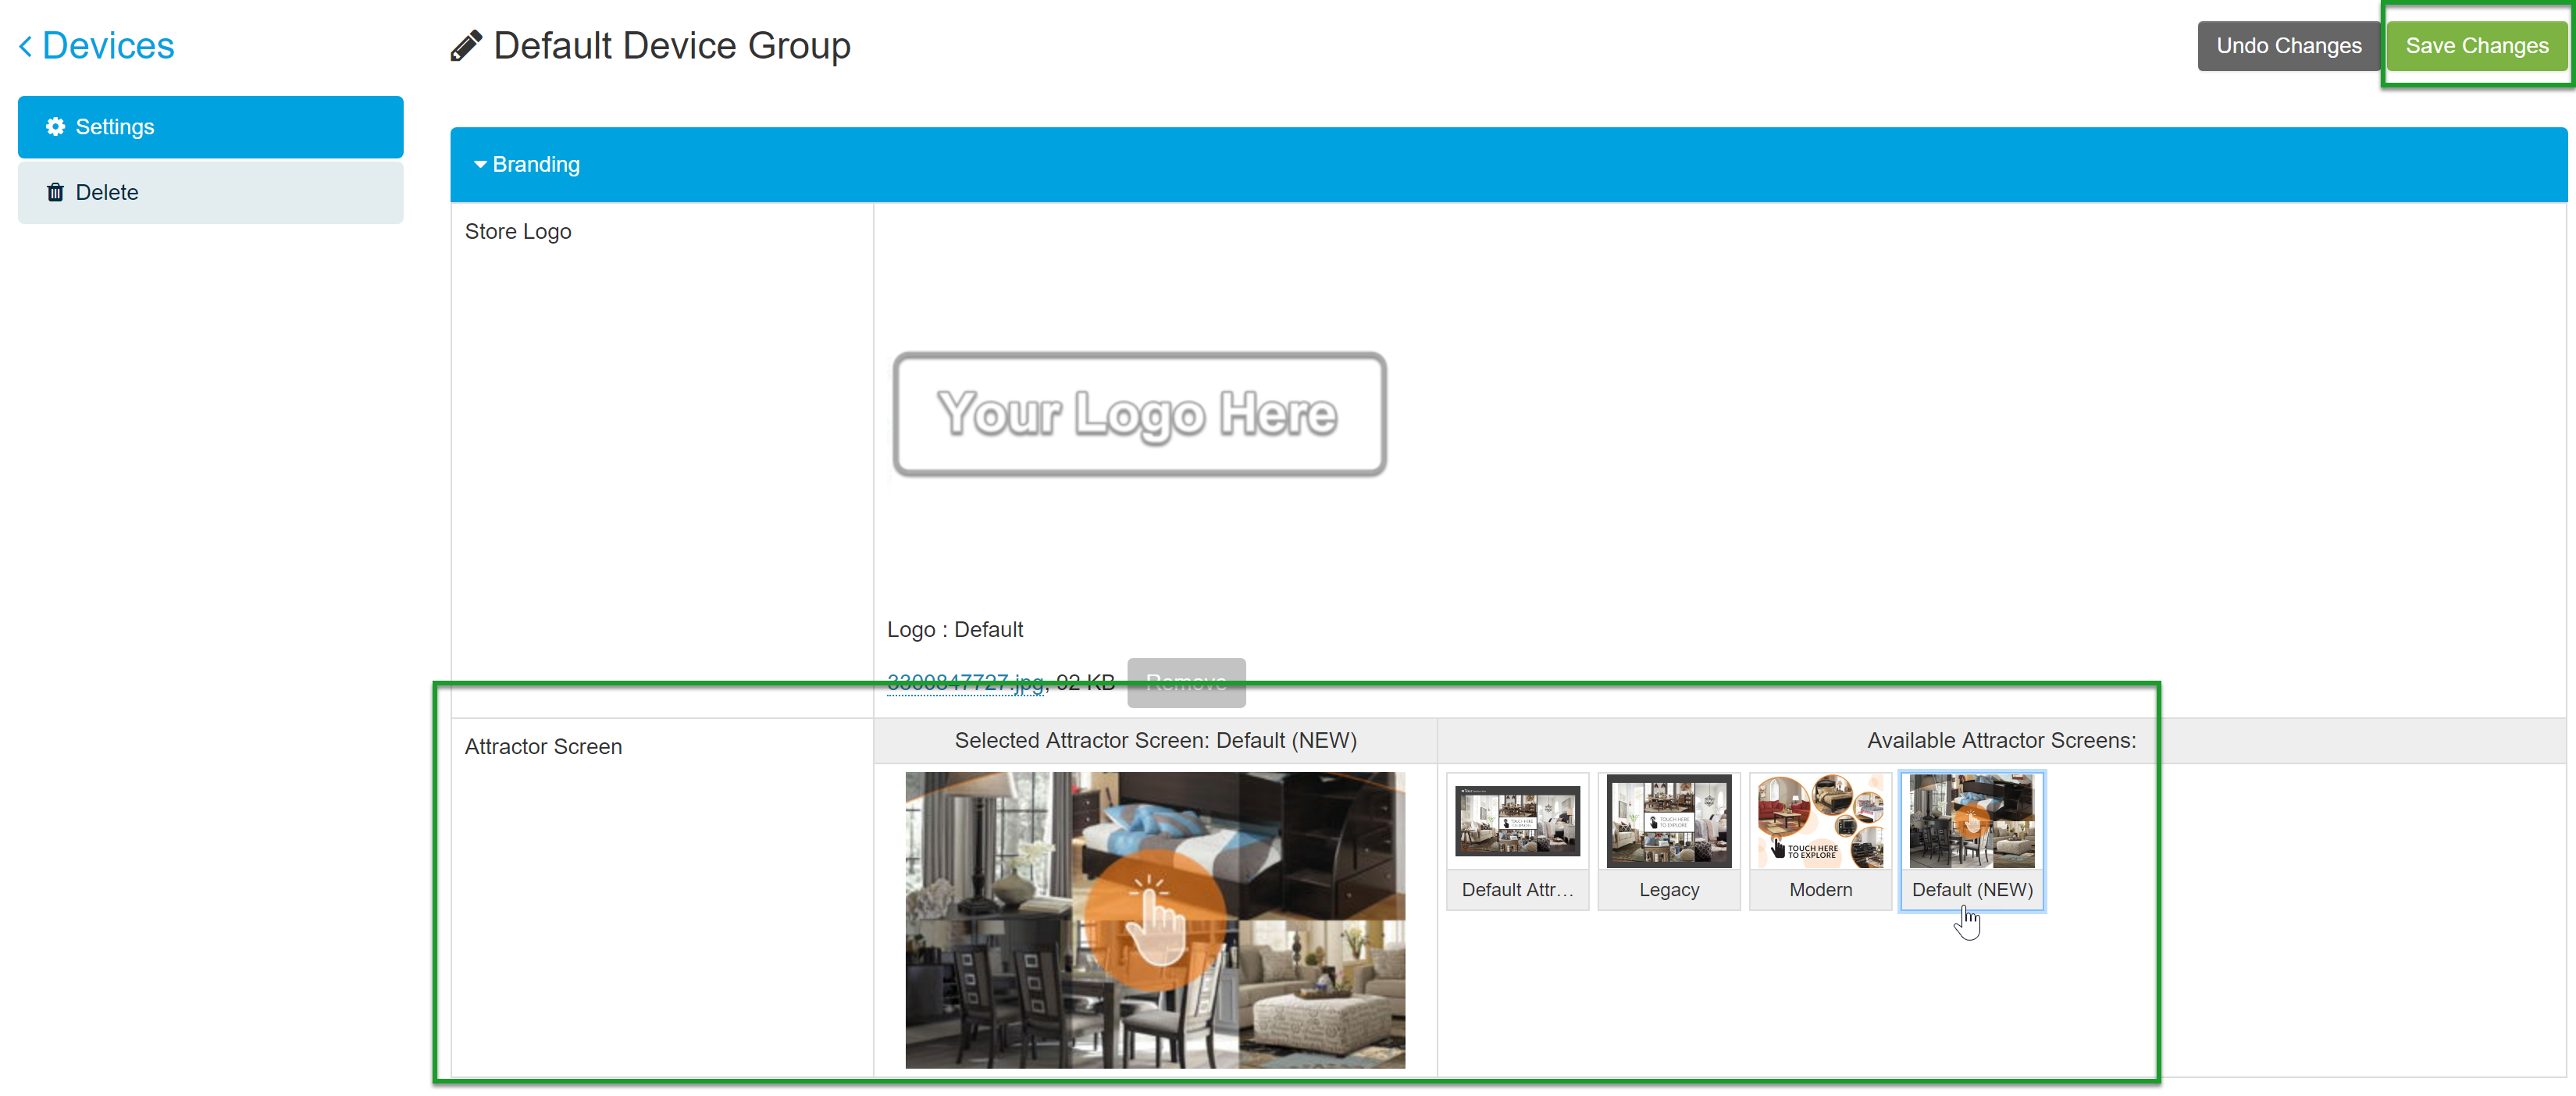
Add or Update Your Logo
Your company logo appears in the top left corner of the attractor screen. ![]()
To add or update your business logo, select Choose an image.

To delete an uploaded logo, click Remove.![]()
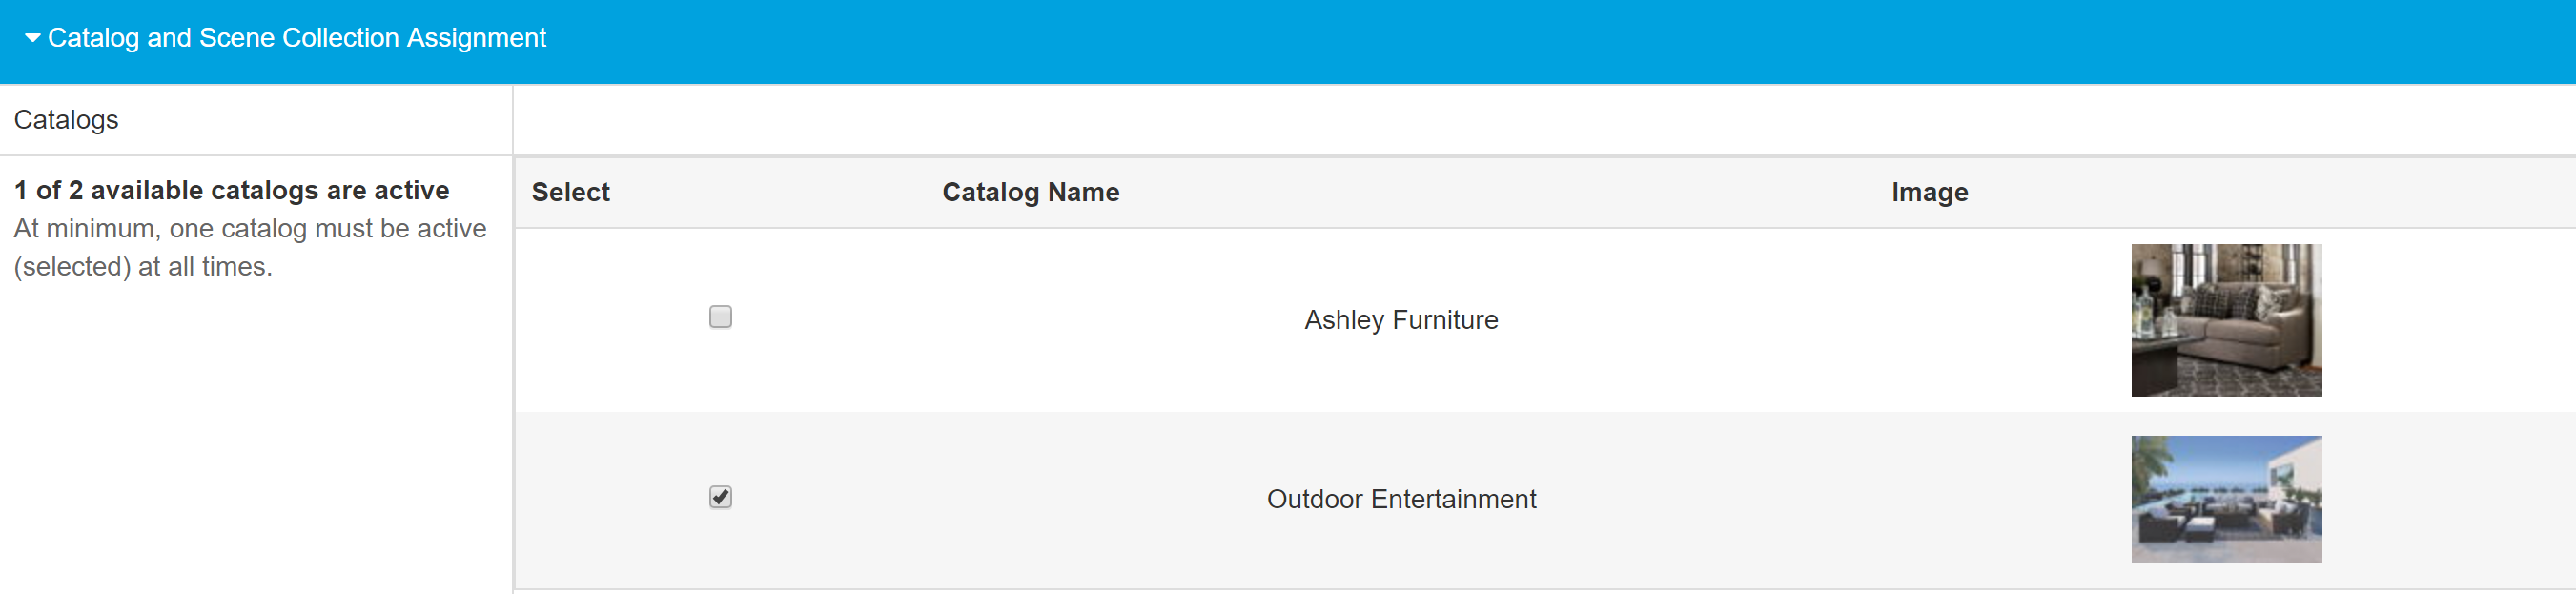
Catalog and Scene Collection Assignment
This section allows you to create and assign custom product catalogs and scene collections to display on the Catalog App.
Catalogs
Your catalogs dictate which products are available for customers to view. Therefore, you must have at least one catalog selected here in order for products to display on your Catalog App.
Learn how to set up additional customized catalogs.
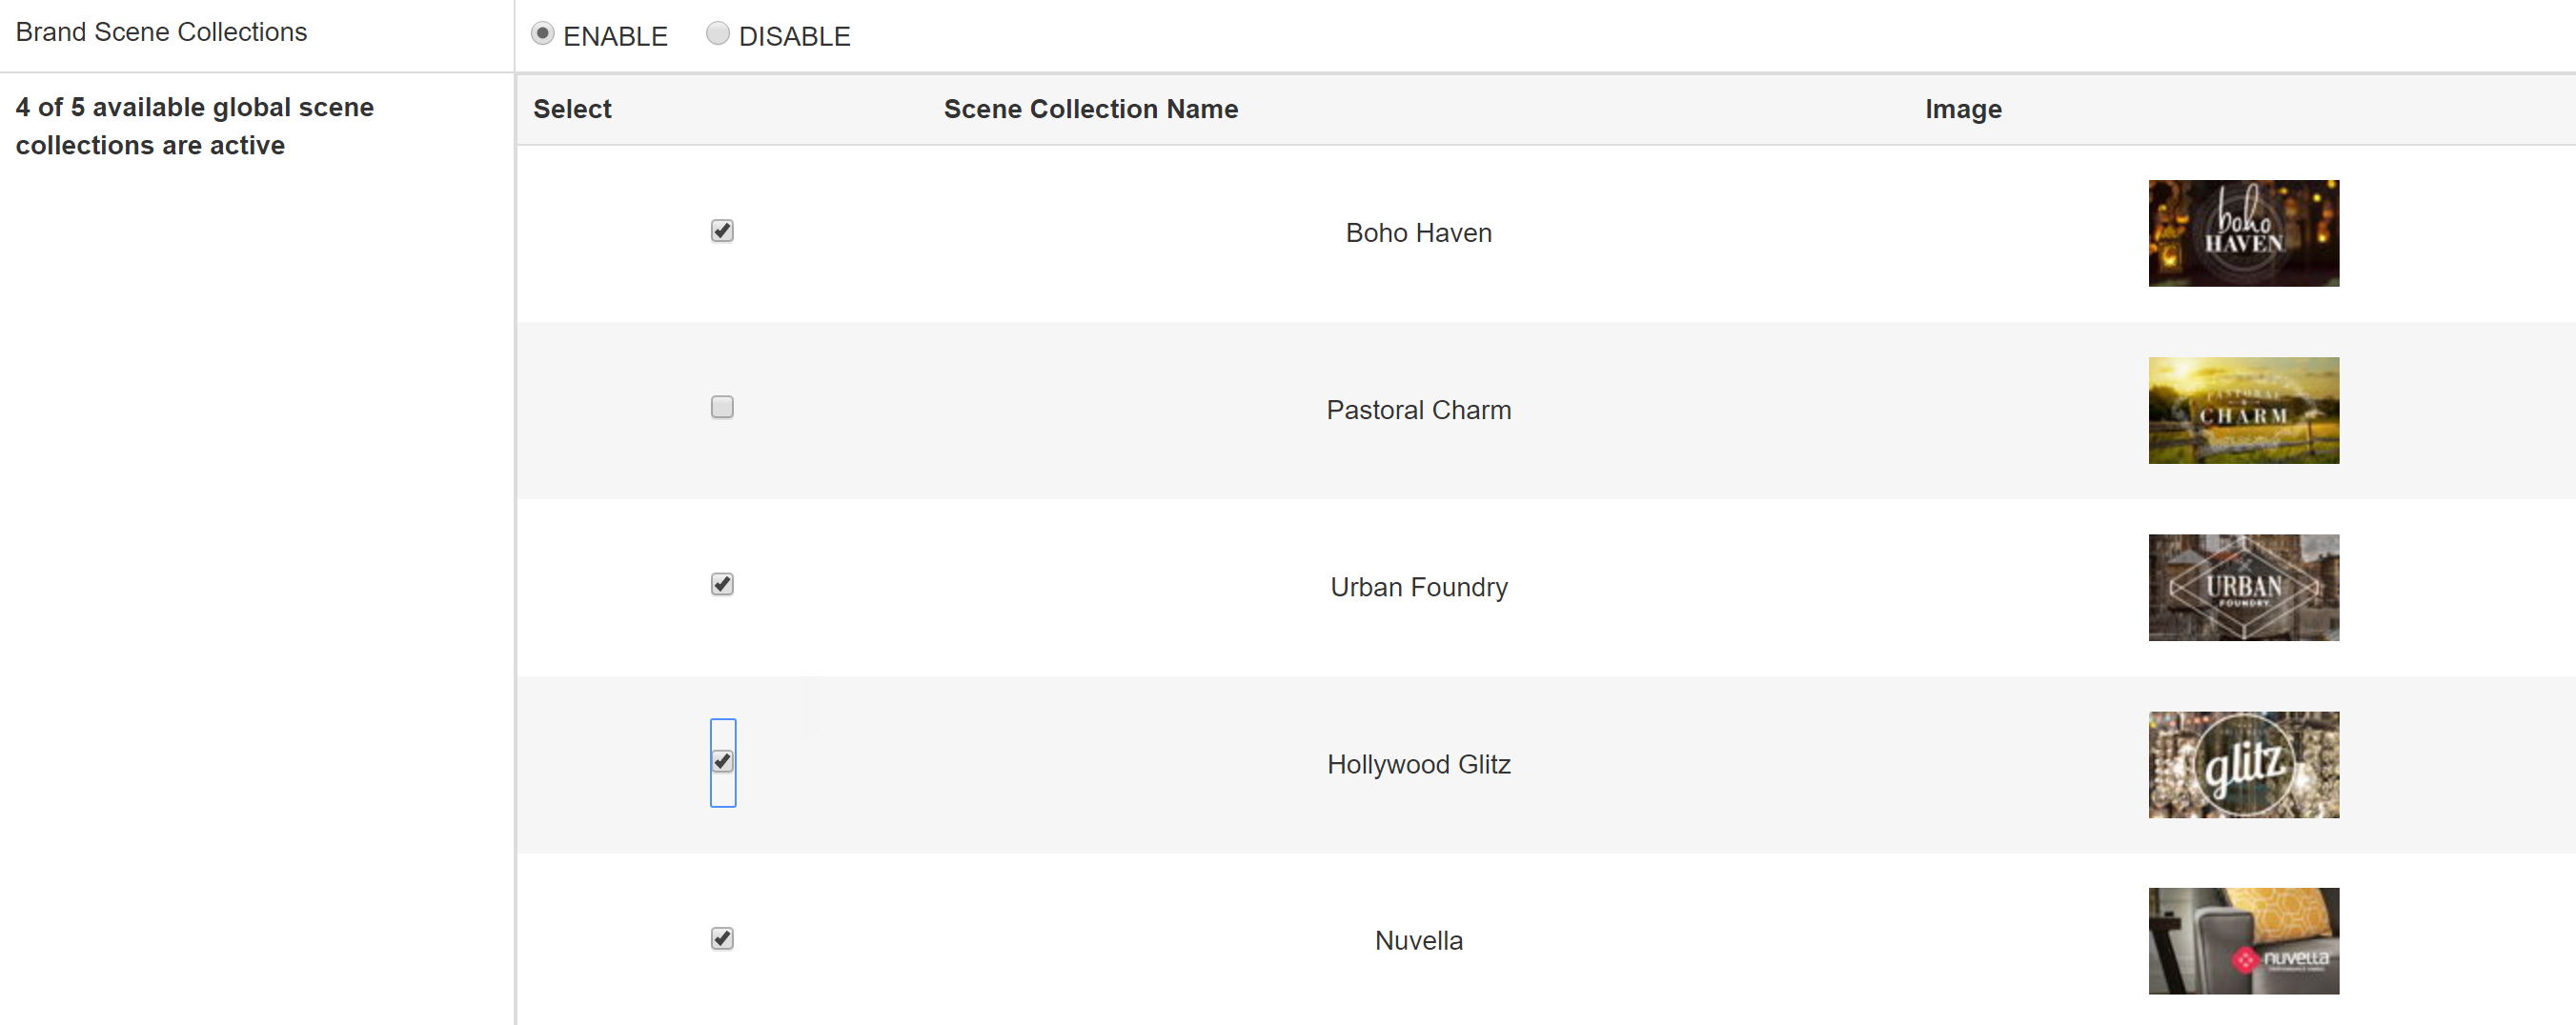
Scene Collections
Select which scene collections you would like to display on your Catalog App.
- Brand Scene Collections - Enable Brand Scene Collections and select from the available list to display pre-configured scene collections organized by brand.

- Account Scene Collections - Enable Account Scene Collections and select from your customized scene collections. These scene collections are those you have created within your Catalog App Manager. Learn how to create account scene collections.
-
Home Page Scene Collections - Select the scene collections you would like to display on the Catalog App home page.
 To incorporate additional brand scene collections into your account, expand your product line and upgrade to a Multi-Brand or Unlimited Brand account.

Price Display
Click Price Display to configure how prices are displayed to your customers.
- Show Prices - Select whether to show or hide prices from displaying to customers in your Catalog App.
- Show Currency Sign - Select whether to show or hide a currency symbol, and set the currency symbol you'd like to display.
- Price Label Options - Use this section to set your price label options. The Show/Don't Show options available here allow you to enable or disable labels for List Price, Retail Price, and Call to Action.
- Set the appearance of your pricing labels by using the available buttons in this section.
- Palette Icon - click this icon to select a color for each pricing label. If you know the hex code of the color you'd like to use, enter it into the field to the right.
- B - this button will display the label in Bold
- I - this button will display the label in Italics
S- this button will display the label with aStrikethroughText Fields - use the text fields to the right of List Price, Retail Price, and Call to Action to set the text of the labels.
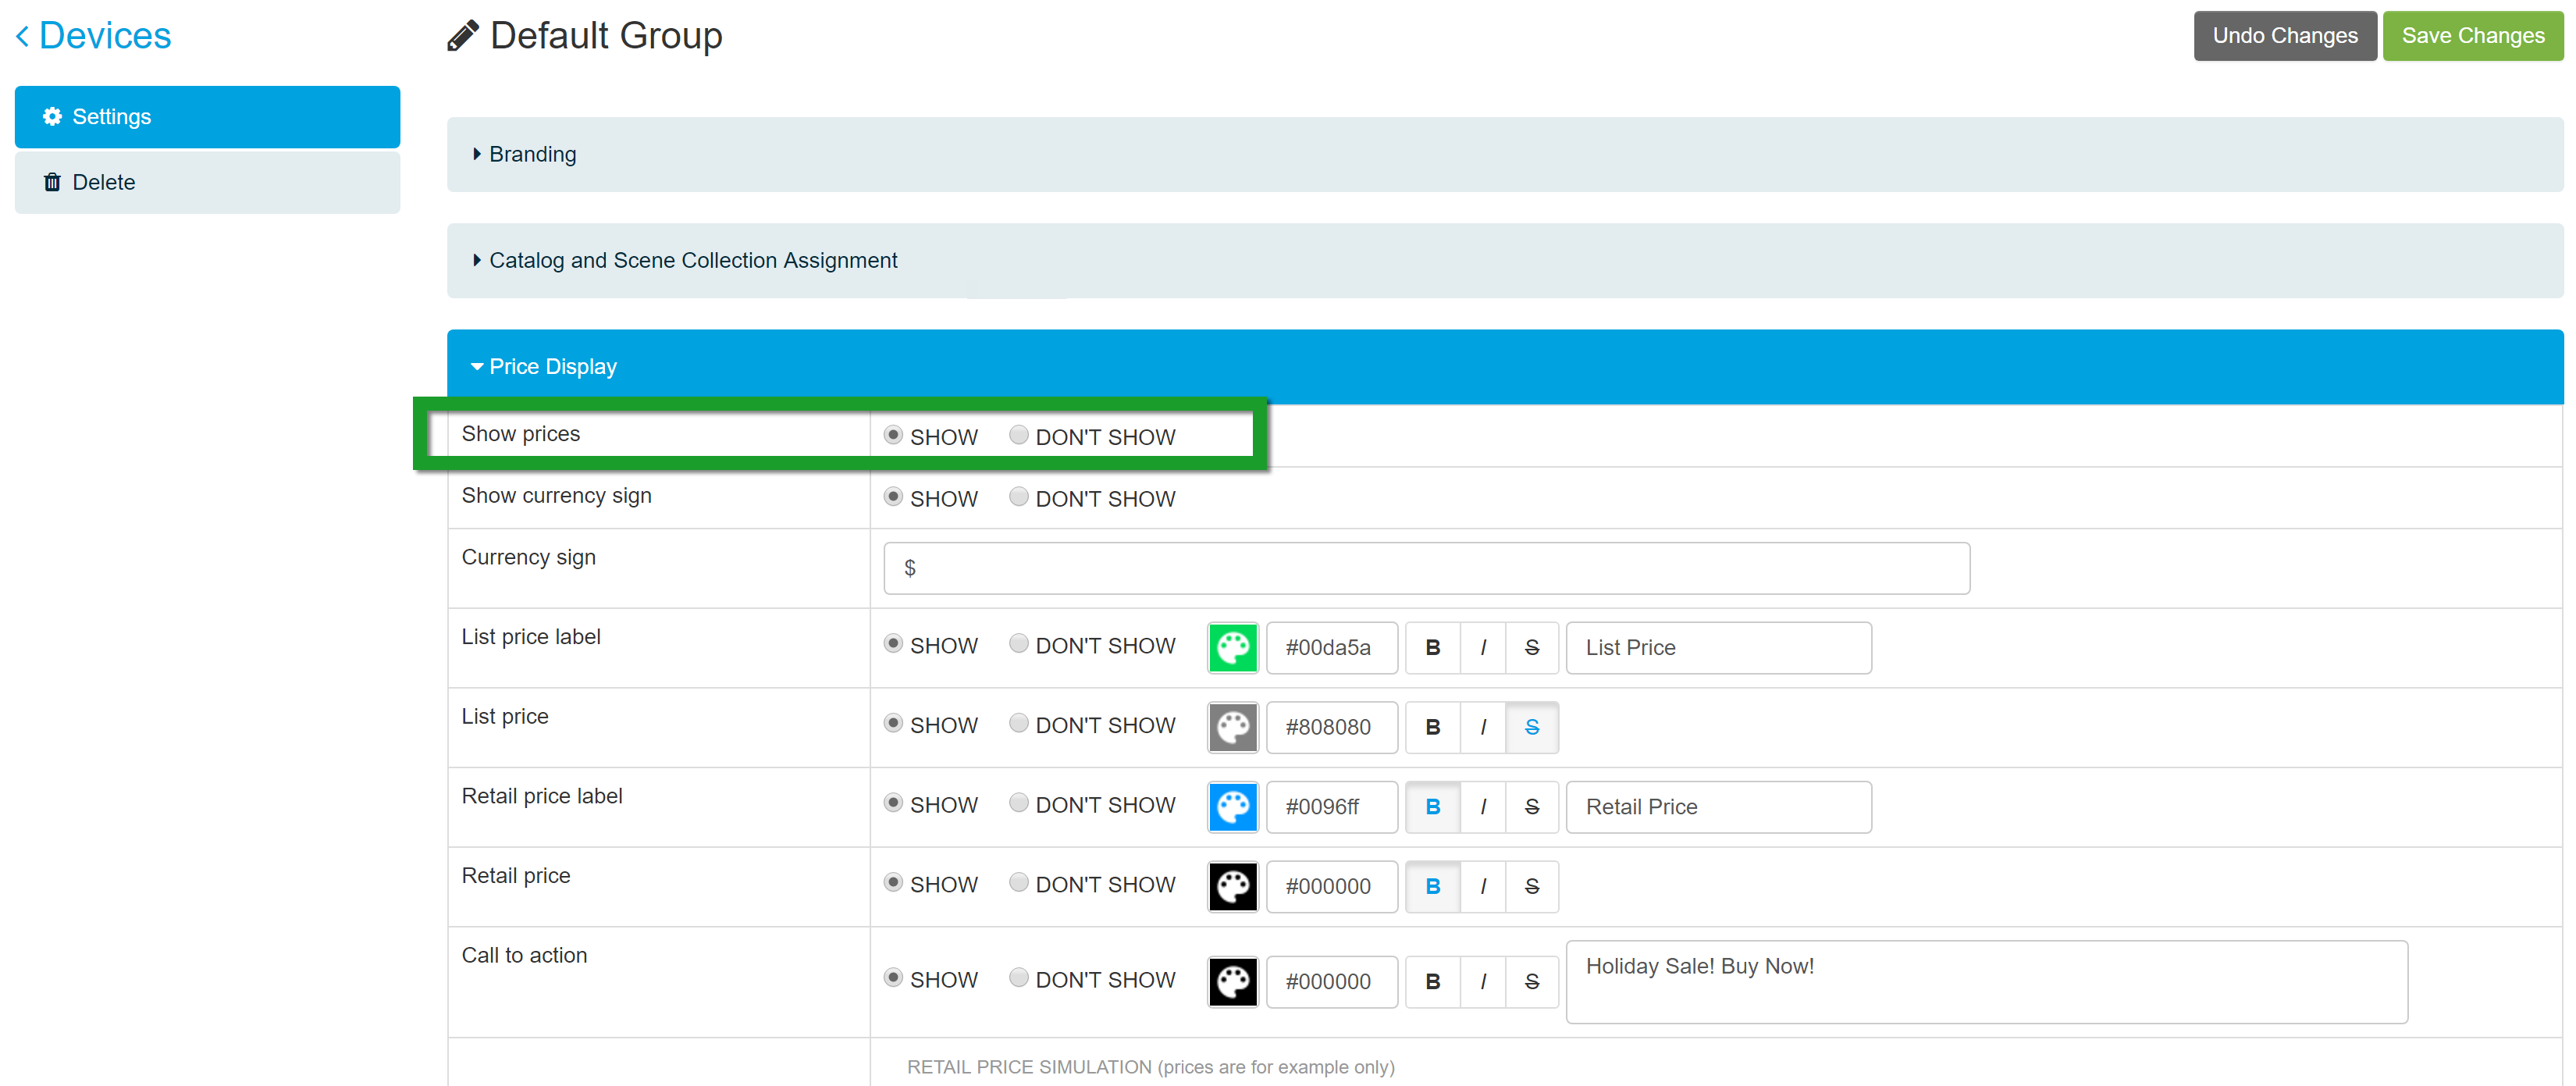
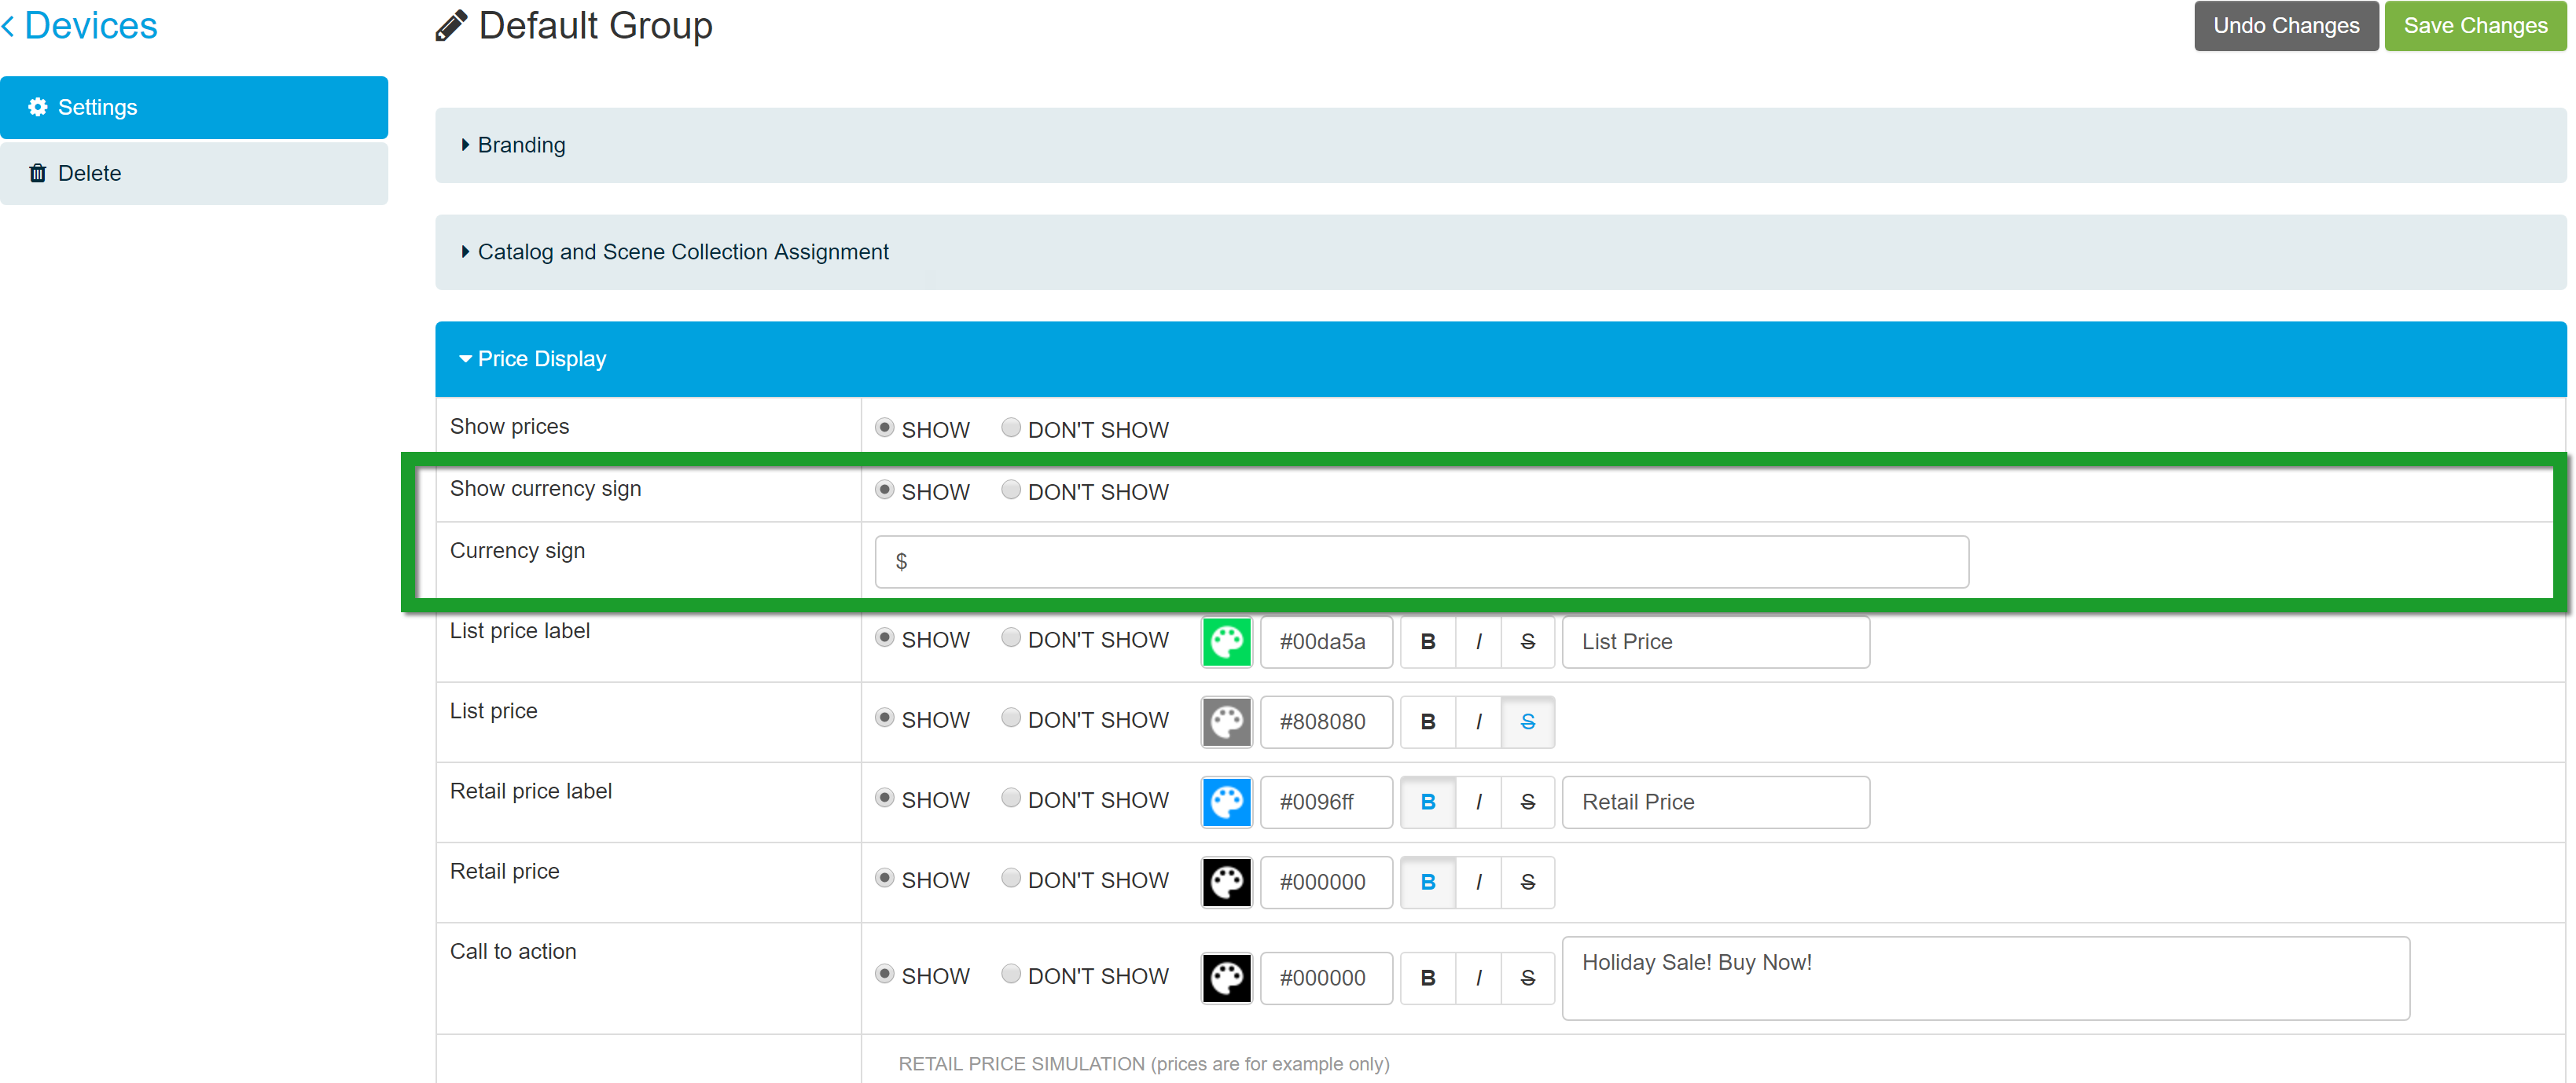
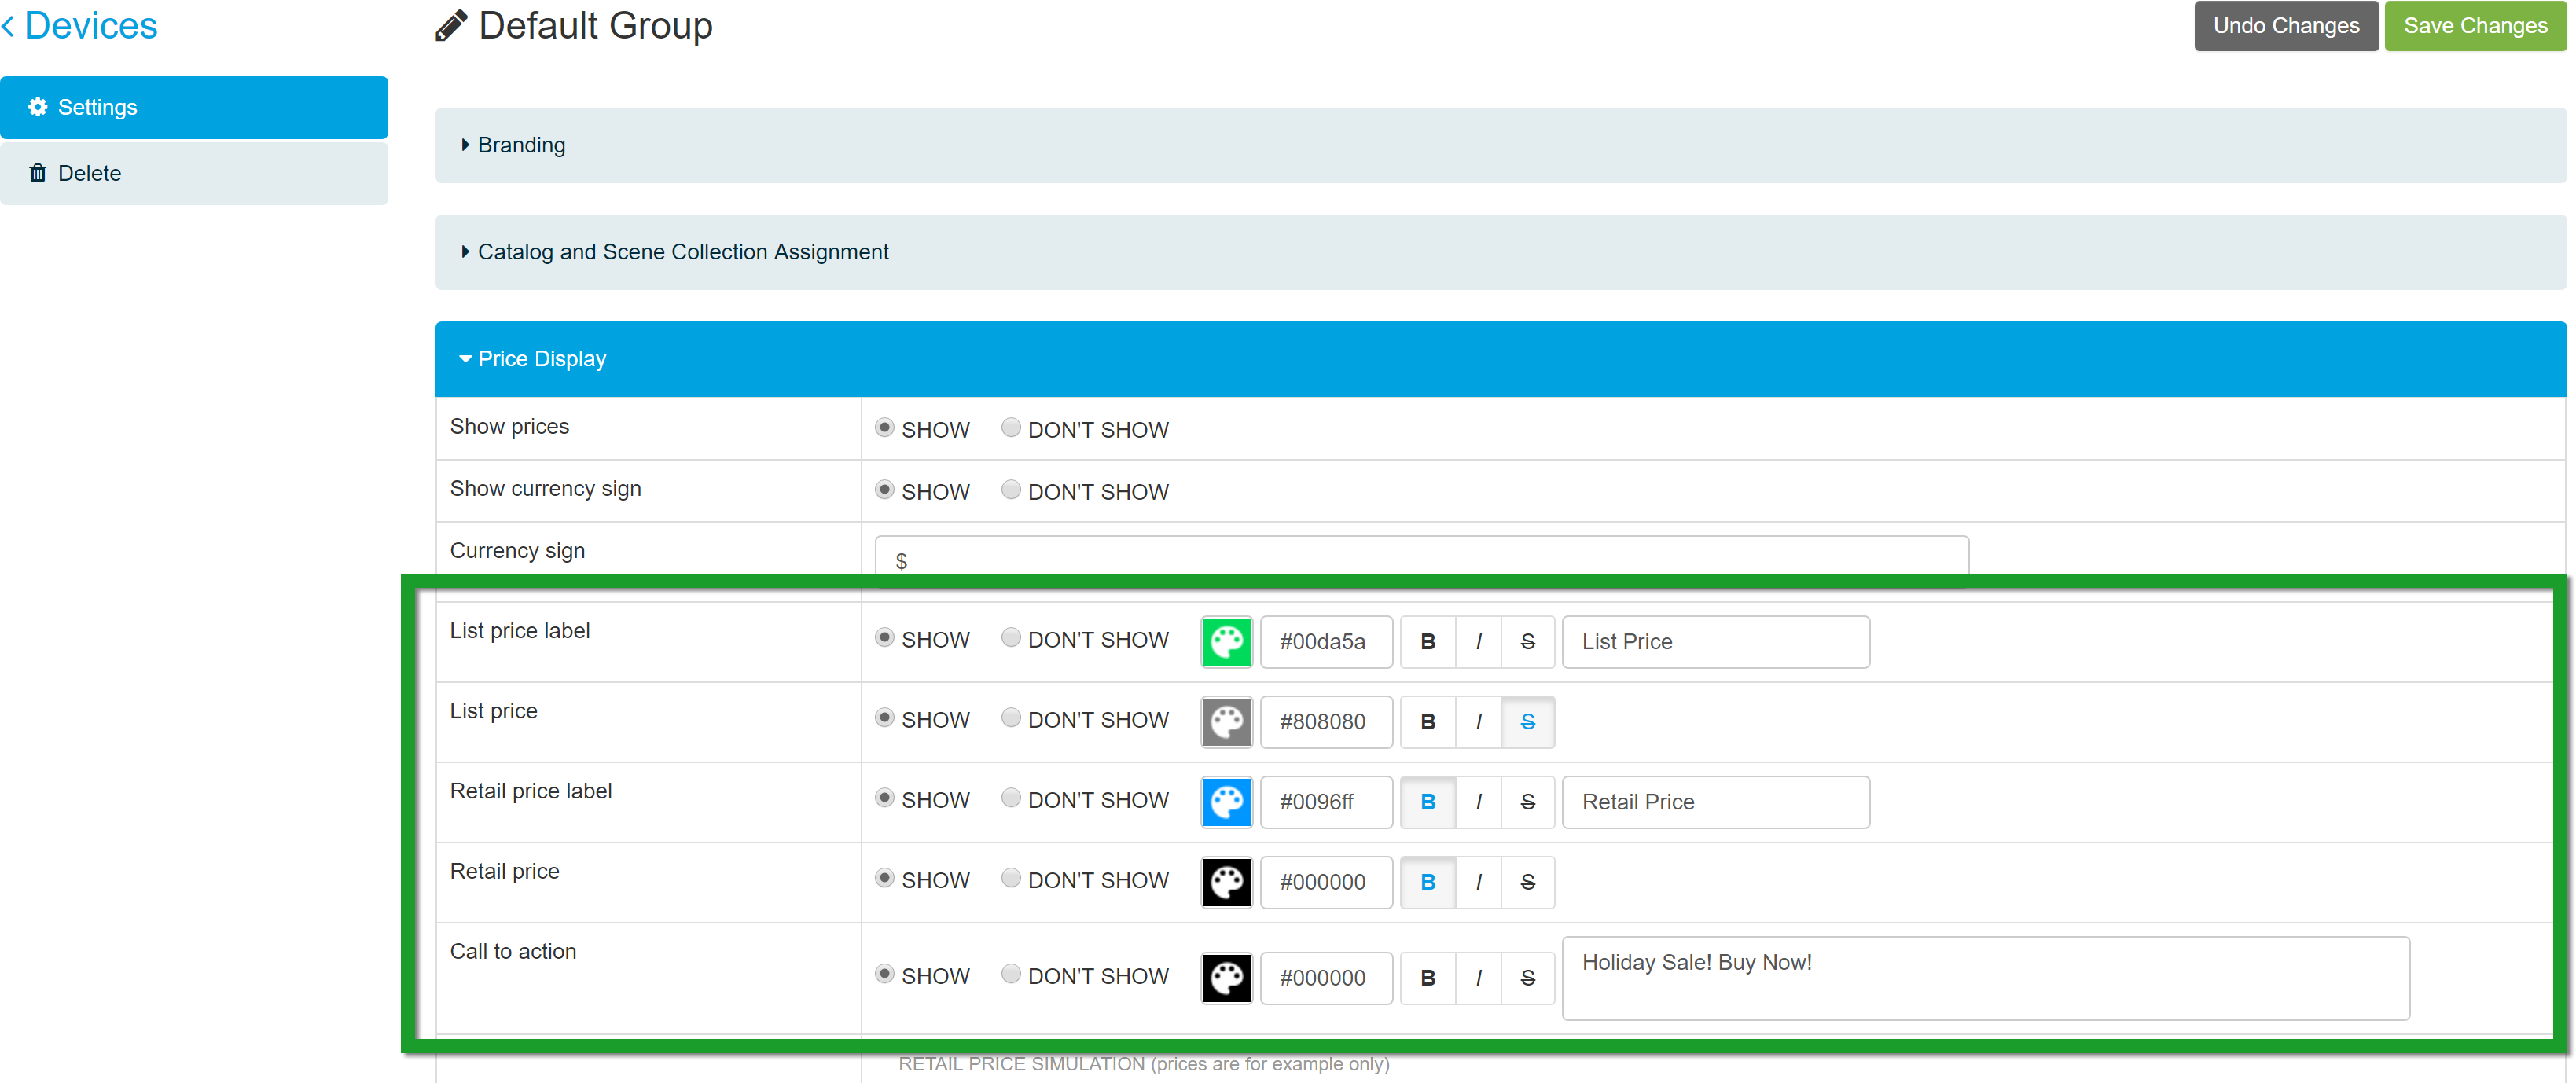
The simulation below these options offers a preview of how your pricing labels will appear to your customers. 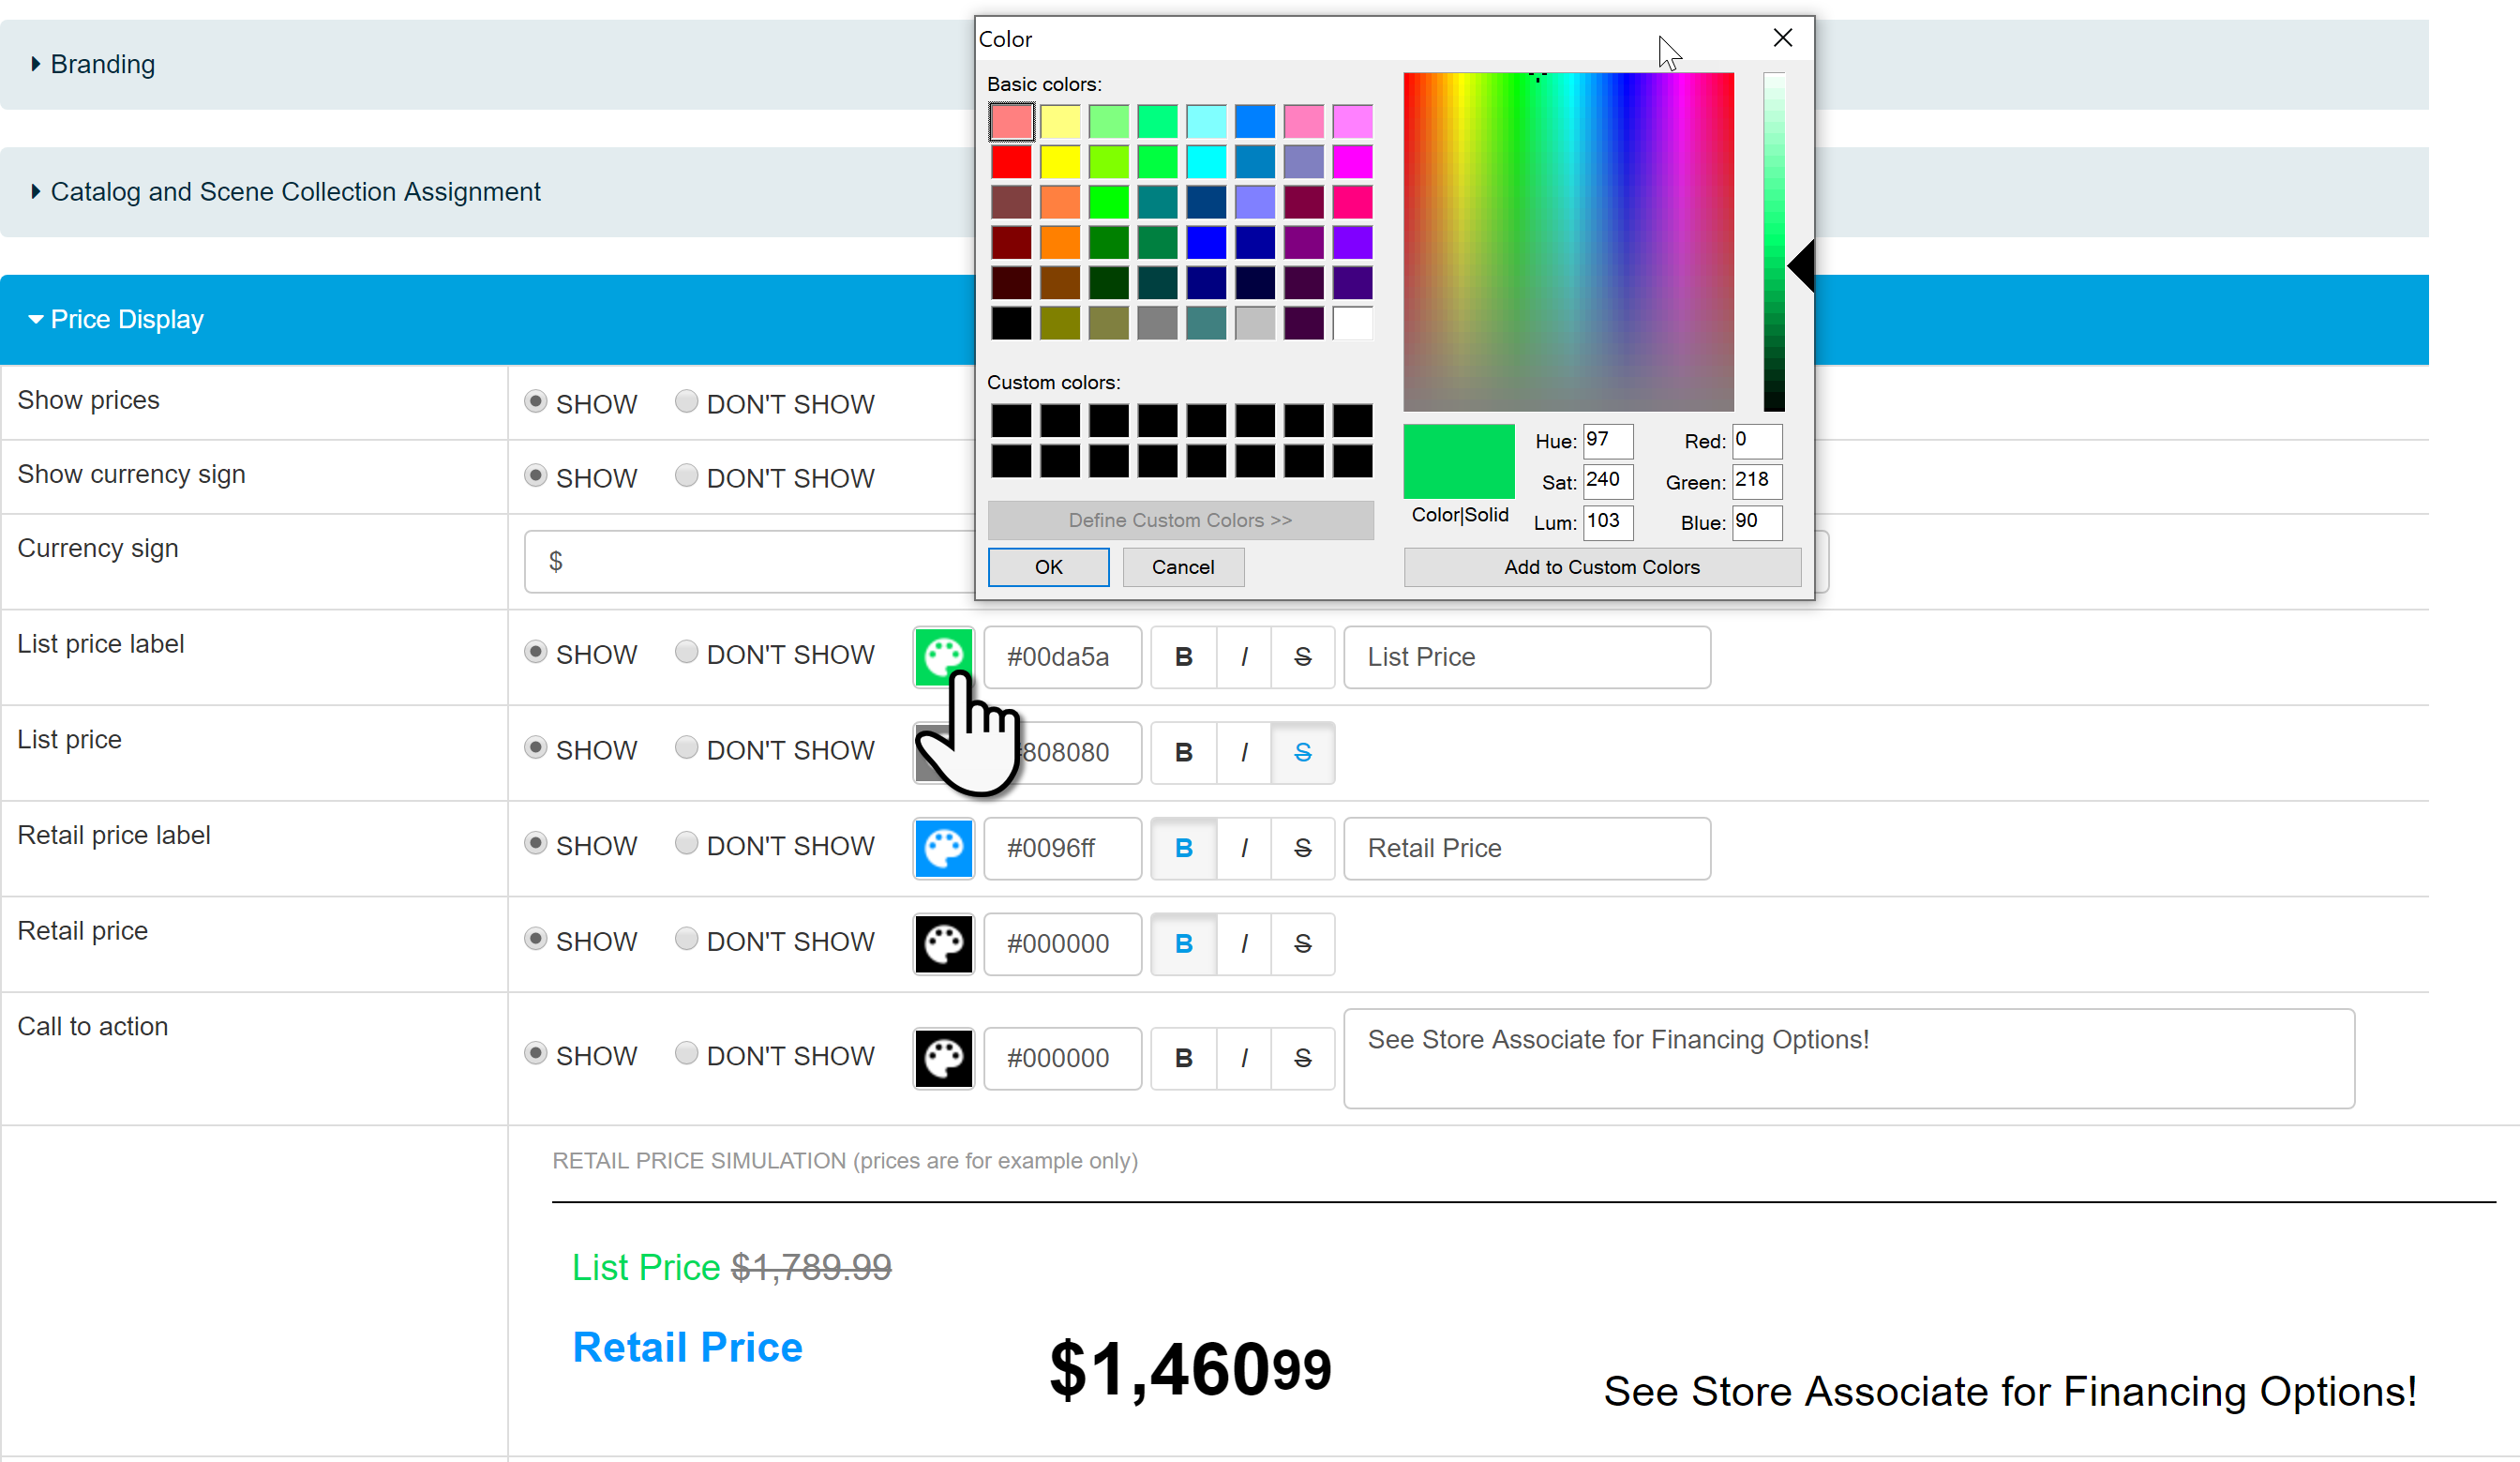
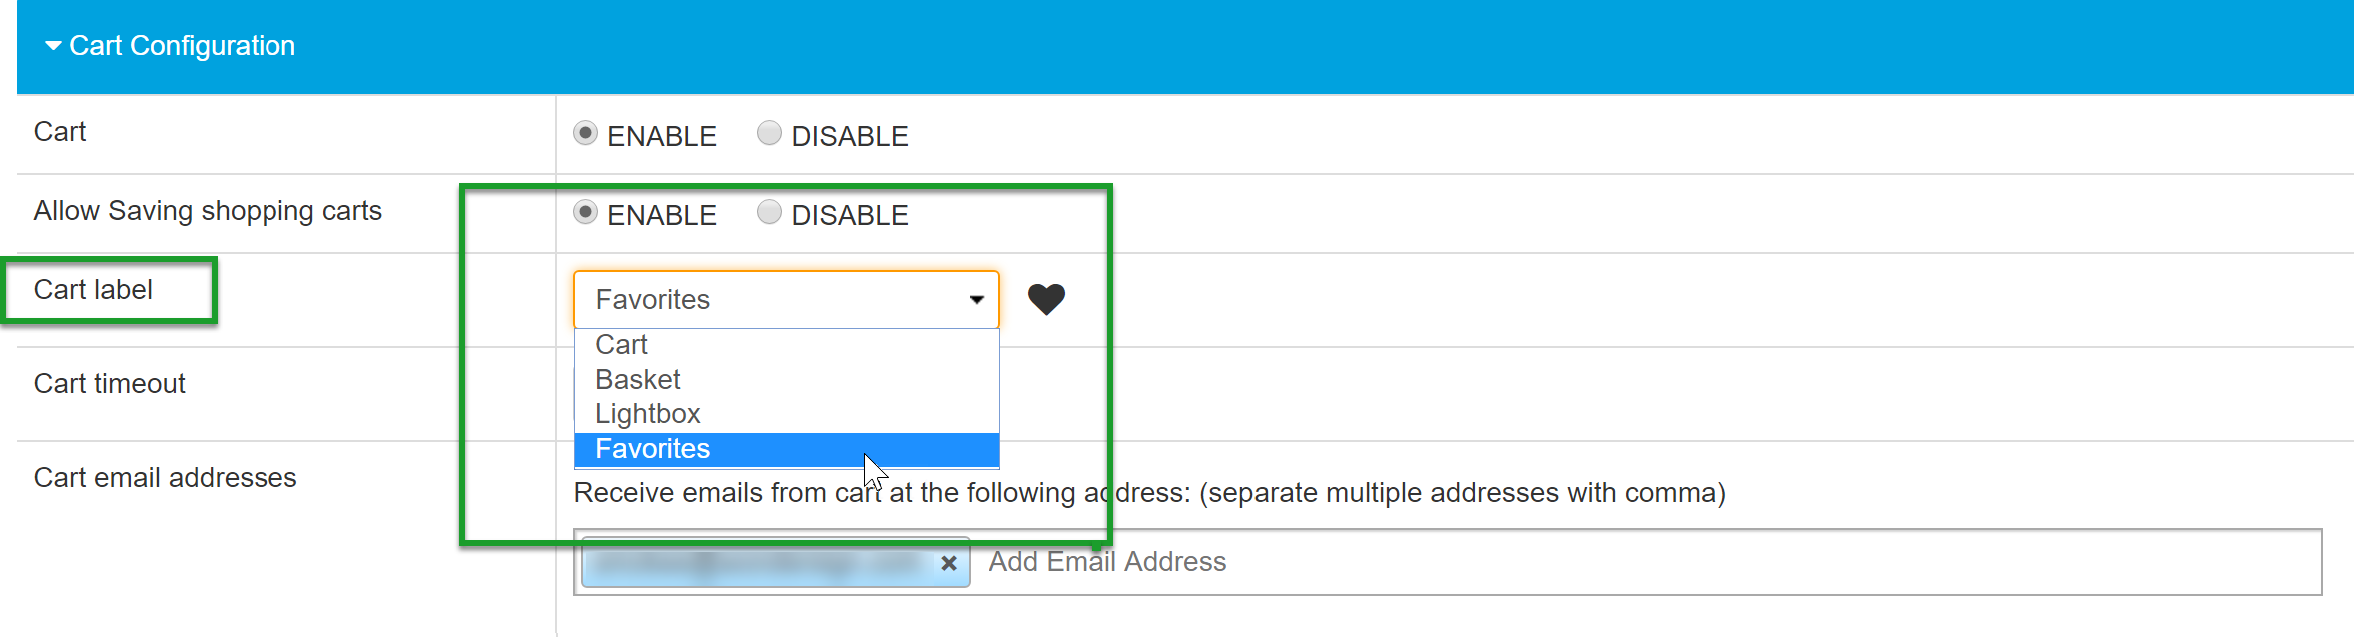
Cart Configuration
Click Cart Configuration to configure how the shopping cart is displayed to your customers.
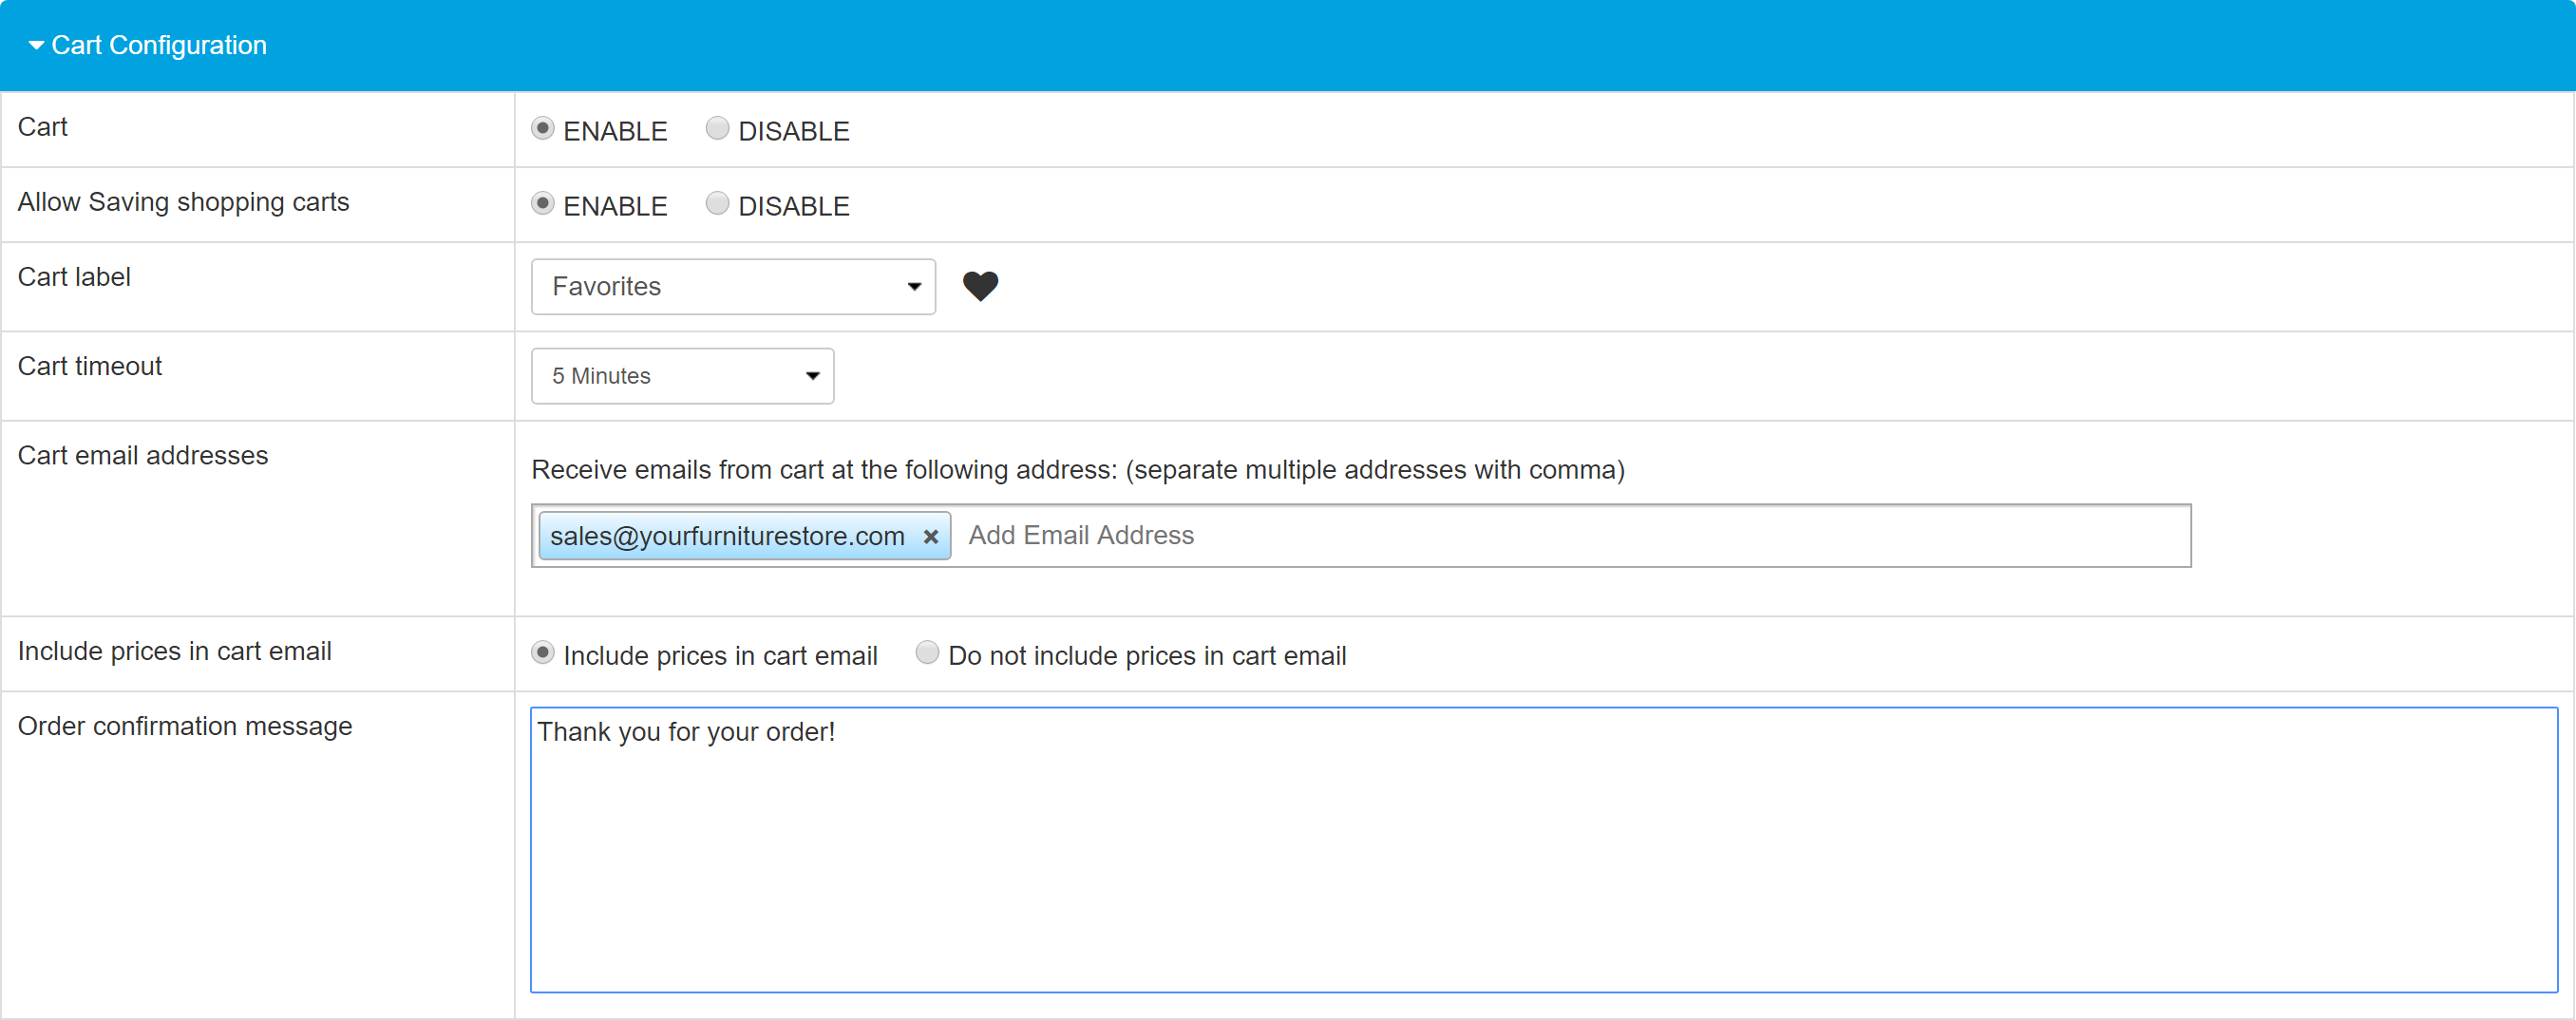
- Cart - Select whether to enable or disable the cart feature.
- Allow Saving of Shopping Carts - Select this option to allow multiple shopping carts to be set up and saved. Learn more about setting up multiple shopping carts.
- Cart Label - Select a label for your shopping cart. The label you choose dictates how your cart is labeled within the app.
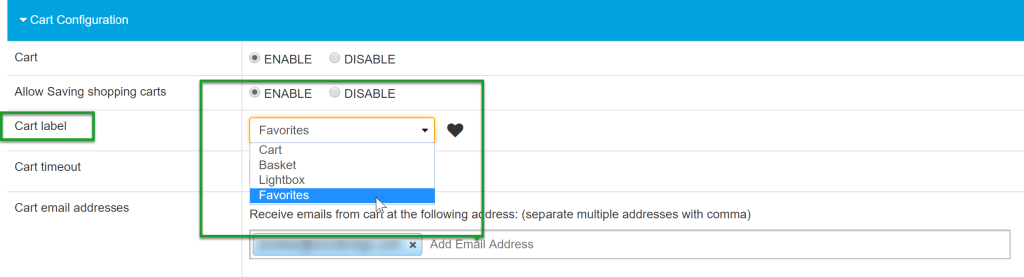
Each label has a different cart icon that displays in accordance with the label chosen.
- Cart Timeout - The cart timeout determines how long the kiosk retains the items in the cart before resetting and clearing the cart if the customer has walked away.
- Cart Email Addresses - Set the email address where you would like to receive all orders that are submitted through the kiosk (usually the sales associate that is entering the order into the point of sale system). You can add as many email addresses as you need by adding a comma between each address entered.
- Include Prices in Cart Email - Select whether the order email your team receives, sent to the email address you defined above, should include pricing information. Cart emails are only seen by the email recipients you designate.
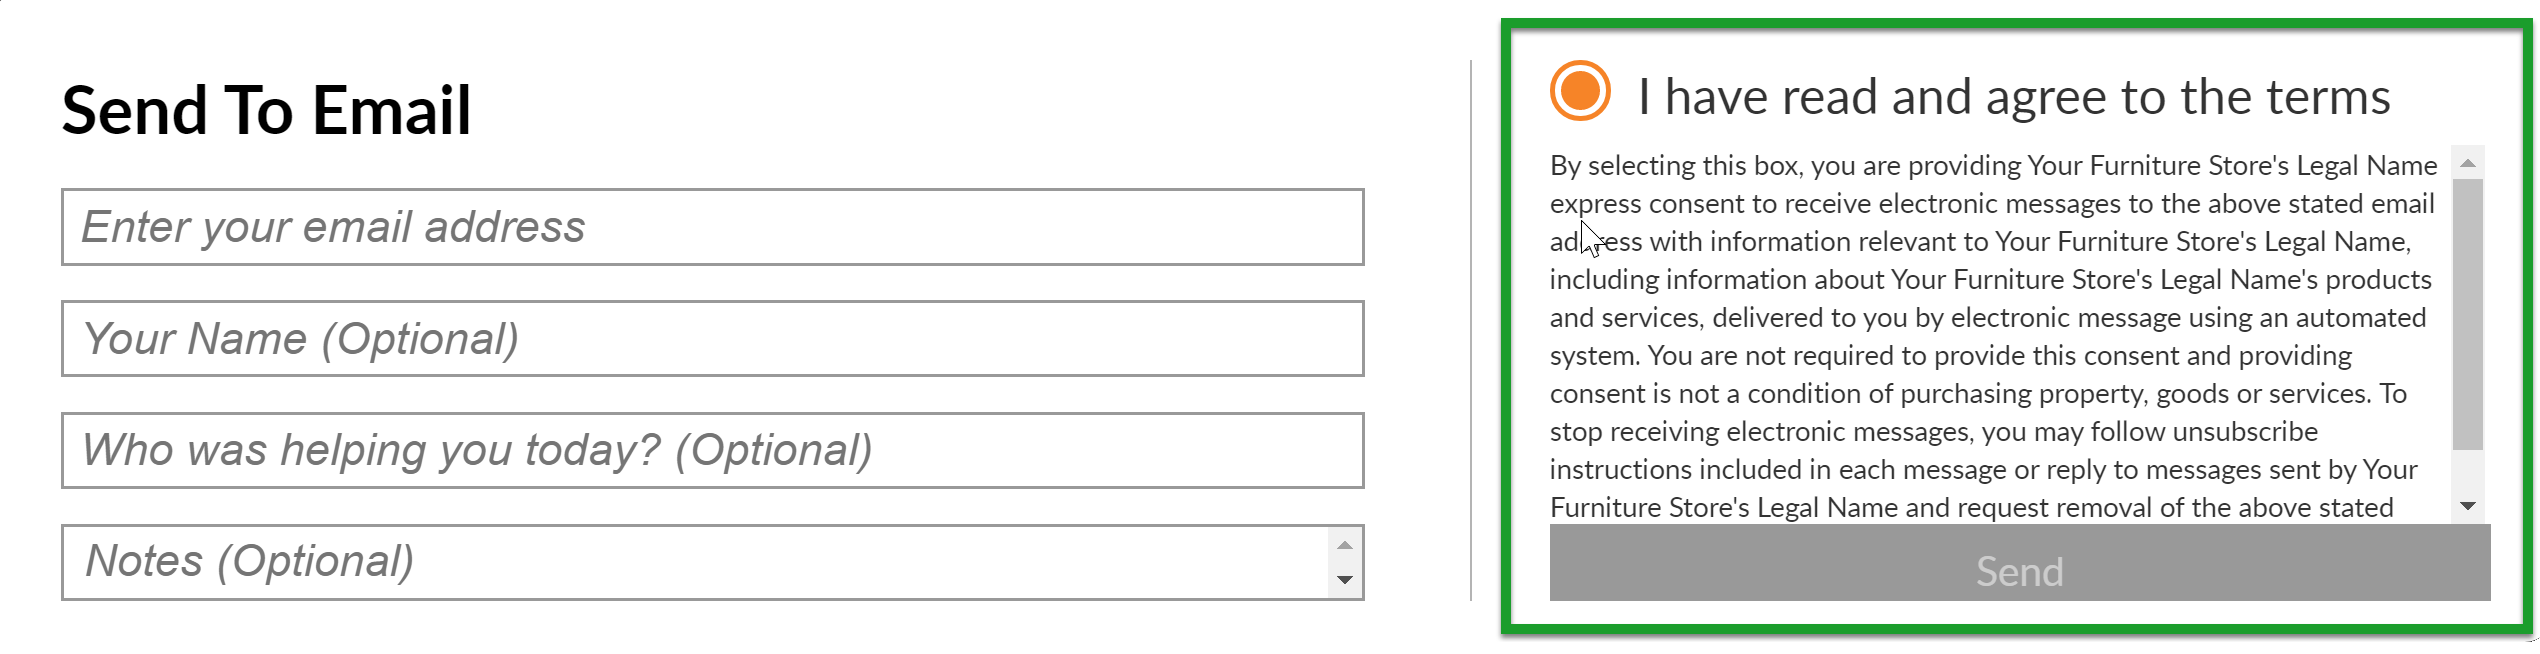
- Order Confirmation Message - Set the order confirmation message. This message is displayed once a customer clicks Add to Cart, enters their information, and clicks Submit.


Store-to-Shopper Communication
Click Store-to-Shopper Communication to configure how you'd like to communicate to your shoppers via your Catalog App.
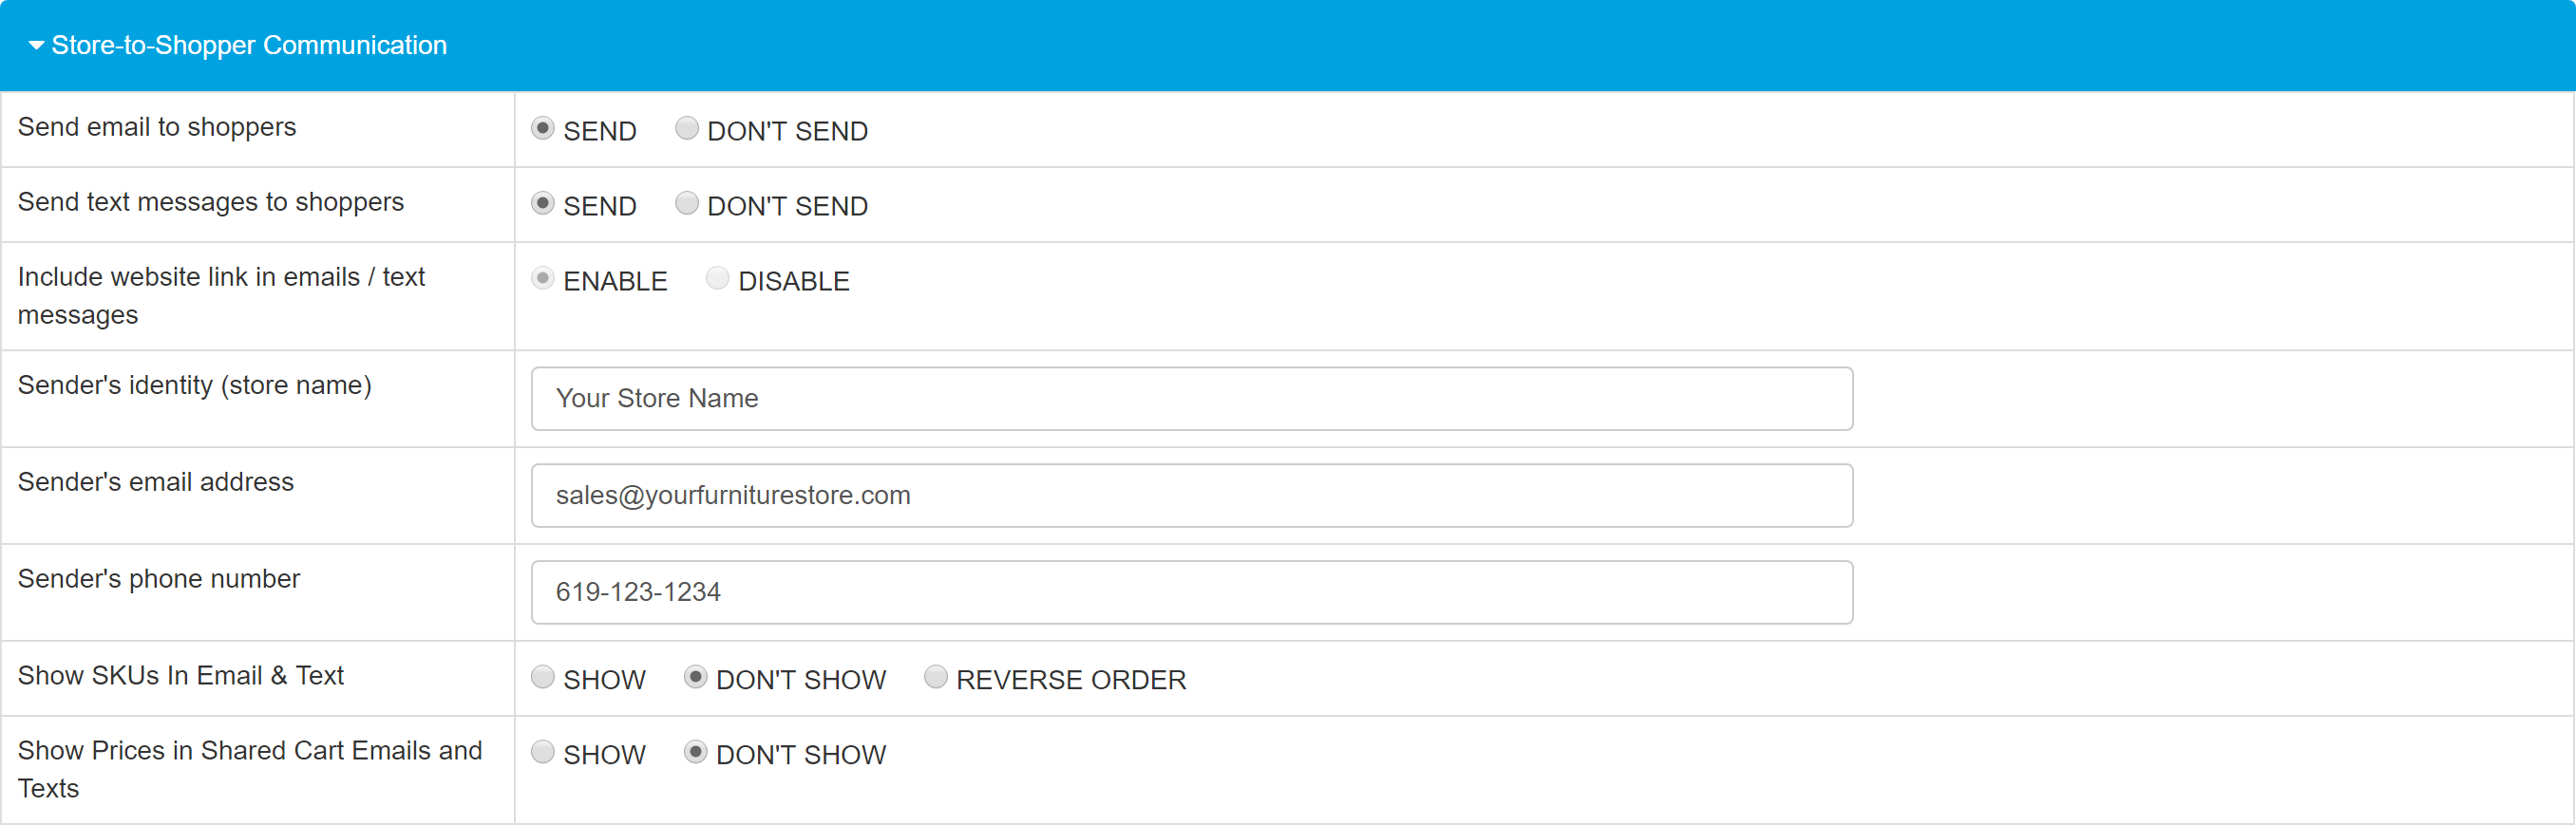
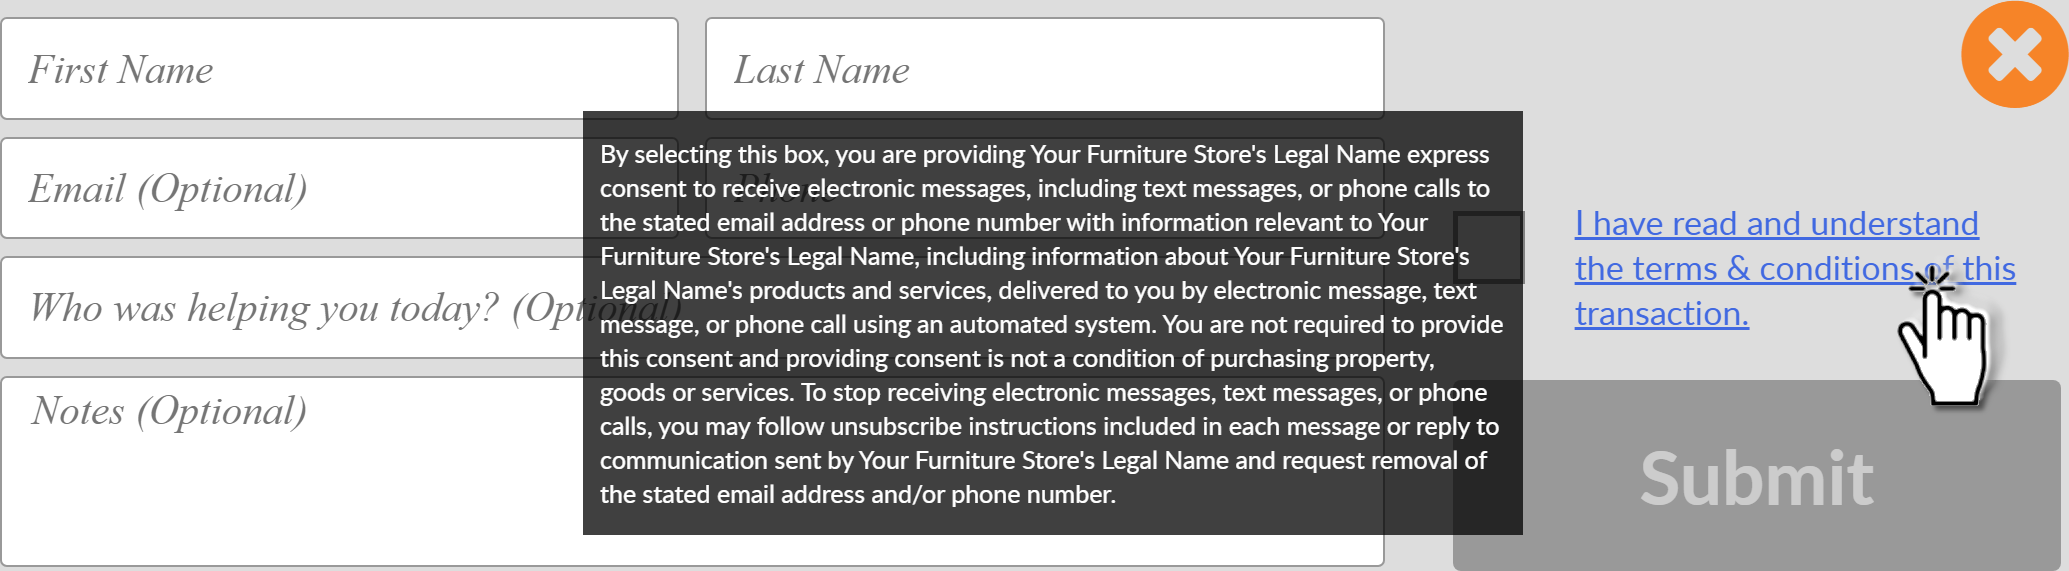
- Send Email/Text Messages to Shoppers - Enable or disable sending emails or text messages from the kiosk to a customer's personal email or phone.
- Sender's Identity - Enter the name to display as the sender on all emails and text messages sent to customers from the Catalog App.
- Sender's Email- Enter your contact information to include in messages sent from the Catalog App. Enter the email address you'd like to include in this contact information.
- Sender's Phone Number - Enter the phone number you'd like to include in the messages sent to customers from the Catalog App.
Show SKUs In Email & Text - Select whether to show, hide, or reverse the order of SKUs in the messages sent to customers from the Catalog App.
Show Prices in Shared Cart Emails and Texts - Select whether to show product pricing in the messages sent by customers from the Catalog App shopping cart.
Advanced Configuration
Click Advanced Configuration to configure additional advanced options.
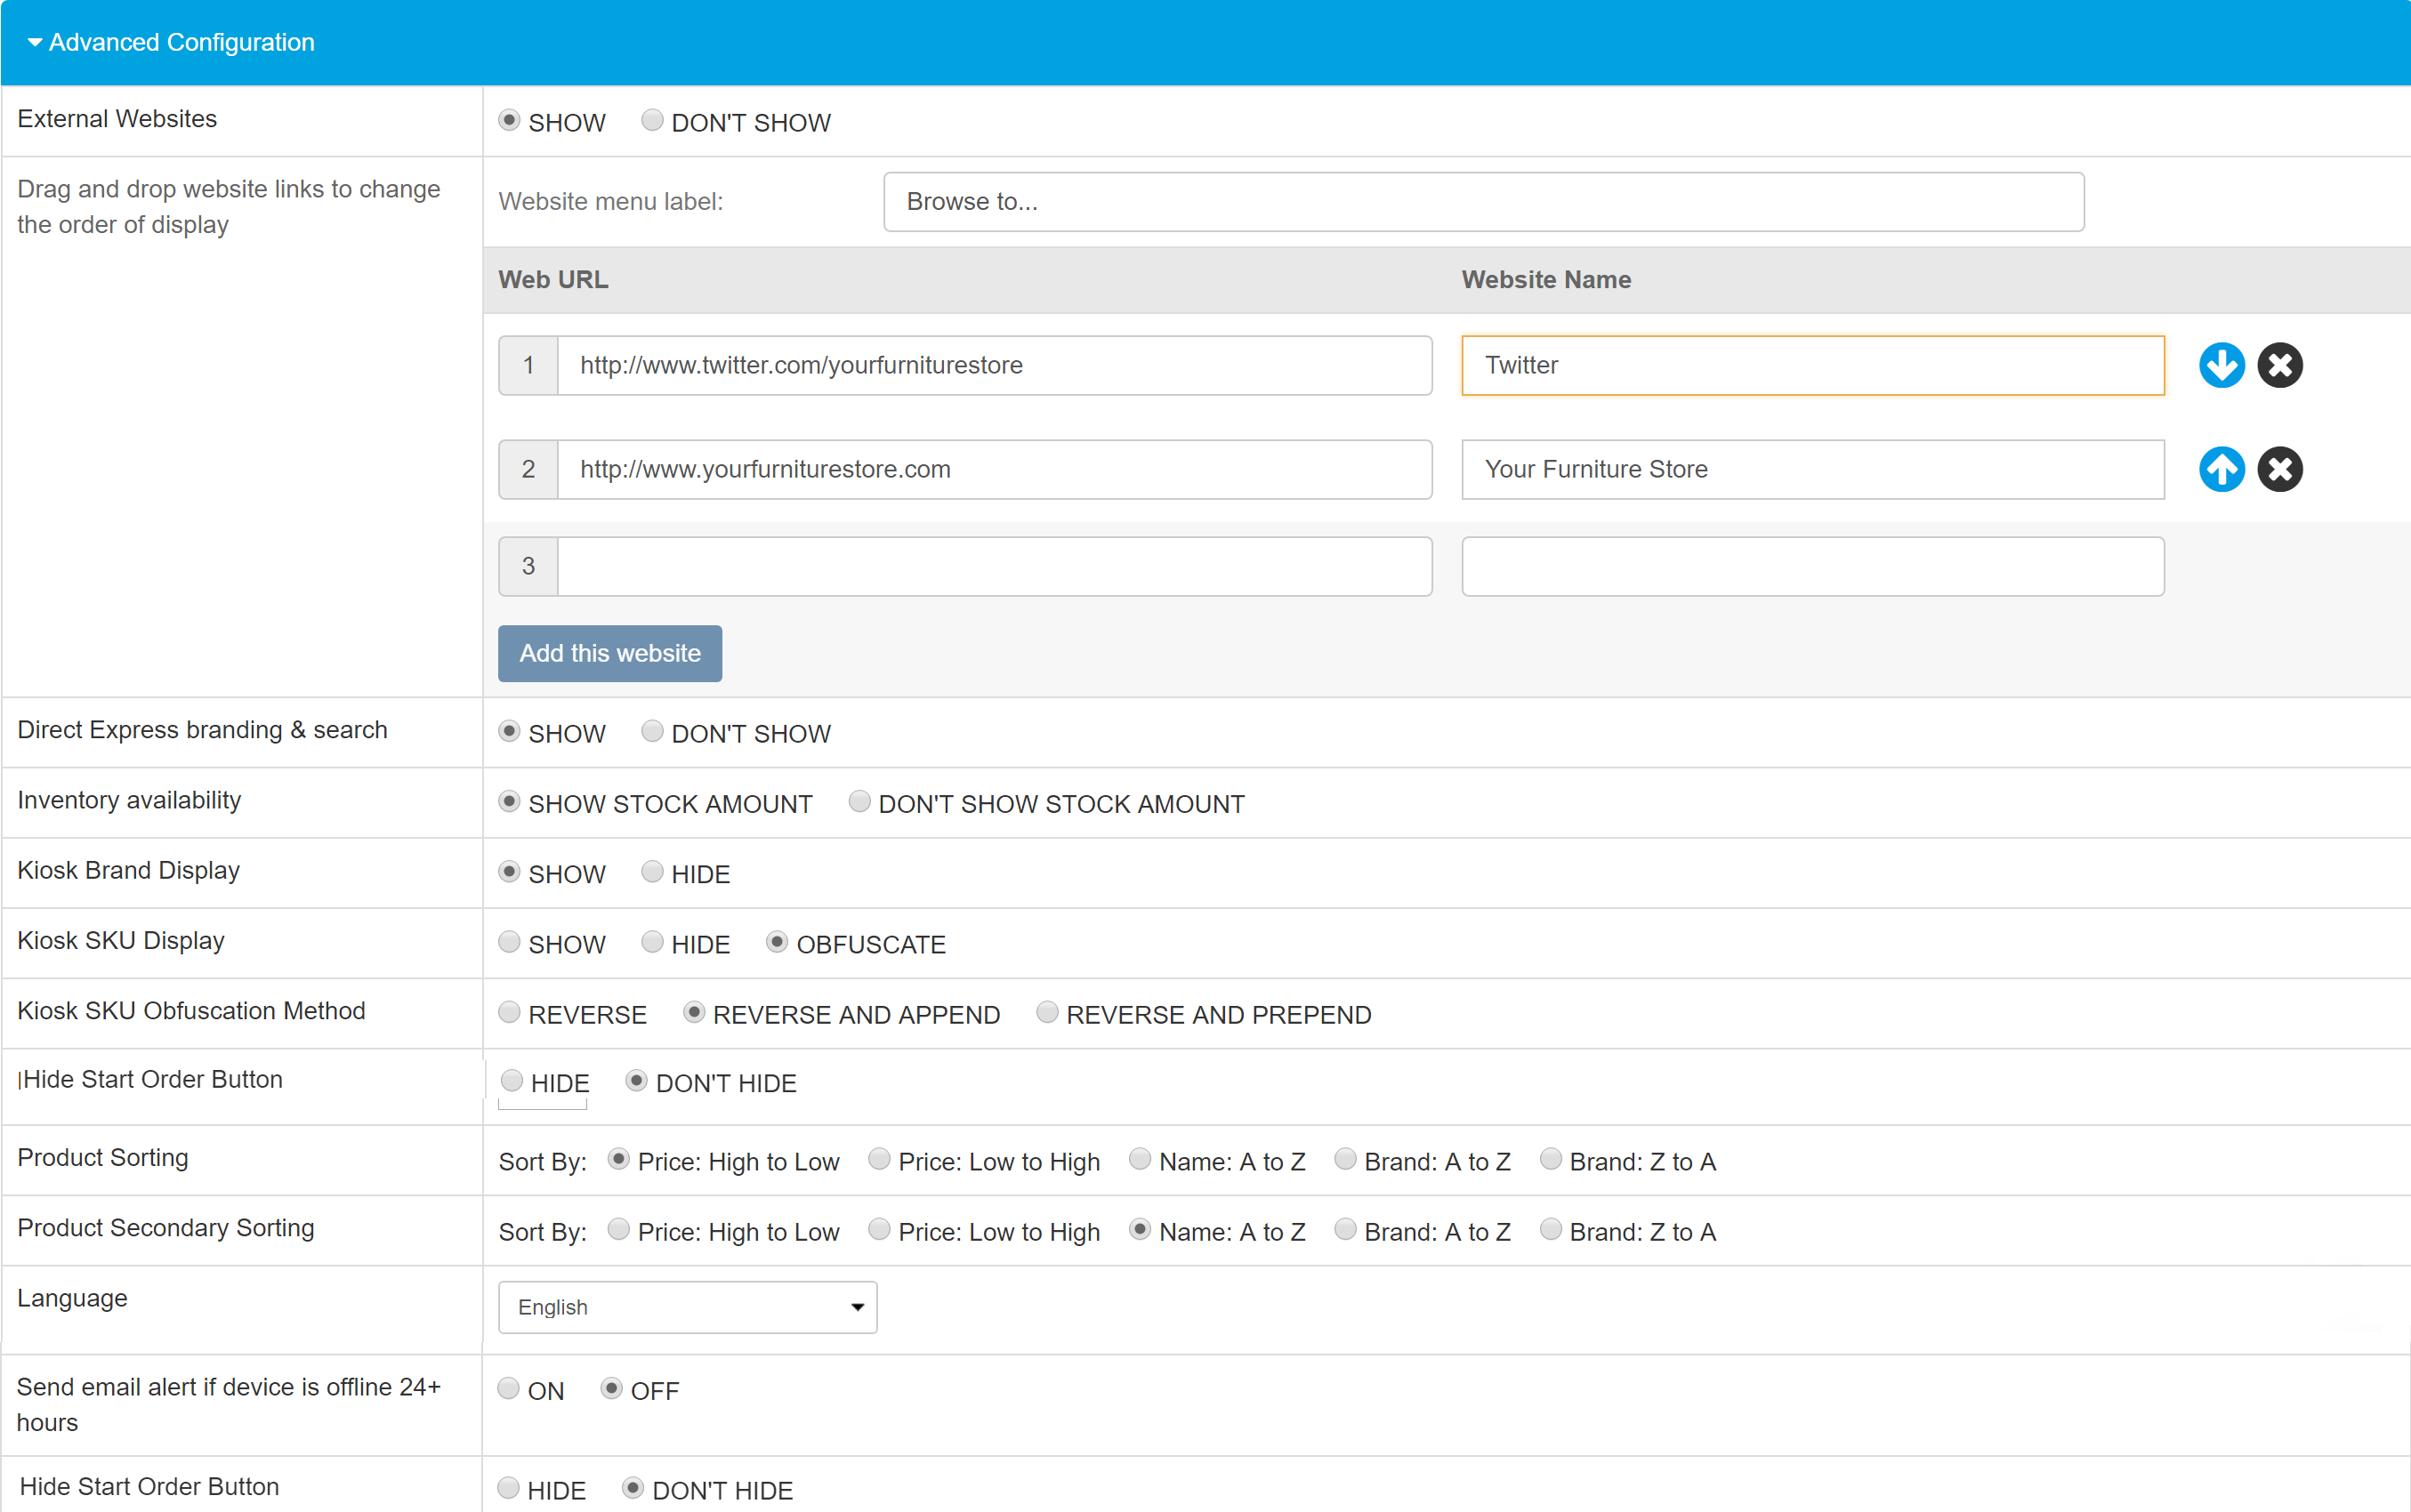
- External Websites
Click Show to enable external websites that can be accessed by customers directly from the Catalog App.- Website Menu Label - The Website Menu Label appears on the website button displayed to your customers. To add a website:
- Type in the full URL (include the prefix http:// or https://).
- Title the website (this is the label that appears in the Catalog App).
- Click Add This Website.

To reorder how websites appear in the Catalog App, either use the up/down arrows to the right of the website names, or drag and drop the rows by dragging websites by their number. Delete websites using the black and white to the right of each website.
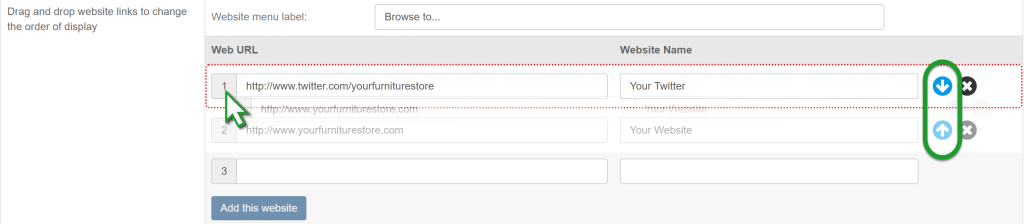
- Direct Express Branding & Search - Select Show if you'd like the Ashley Express designation to appear on eligible items, or Don't Show to hide this designation.
Enabling the Ashley Direct Express option also allows customers to search by Ashley Direct Express items only.
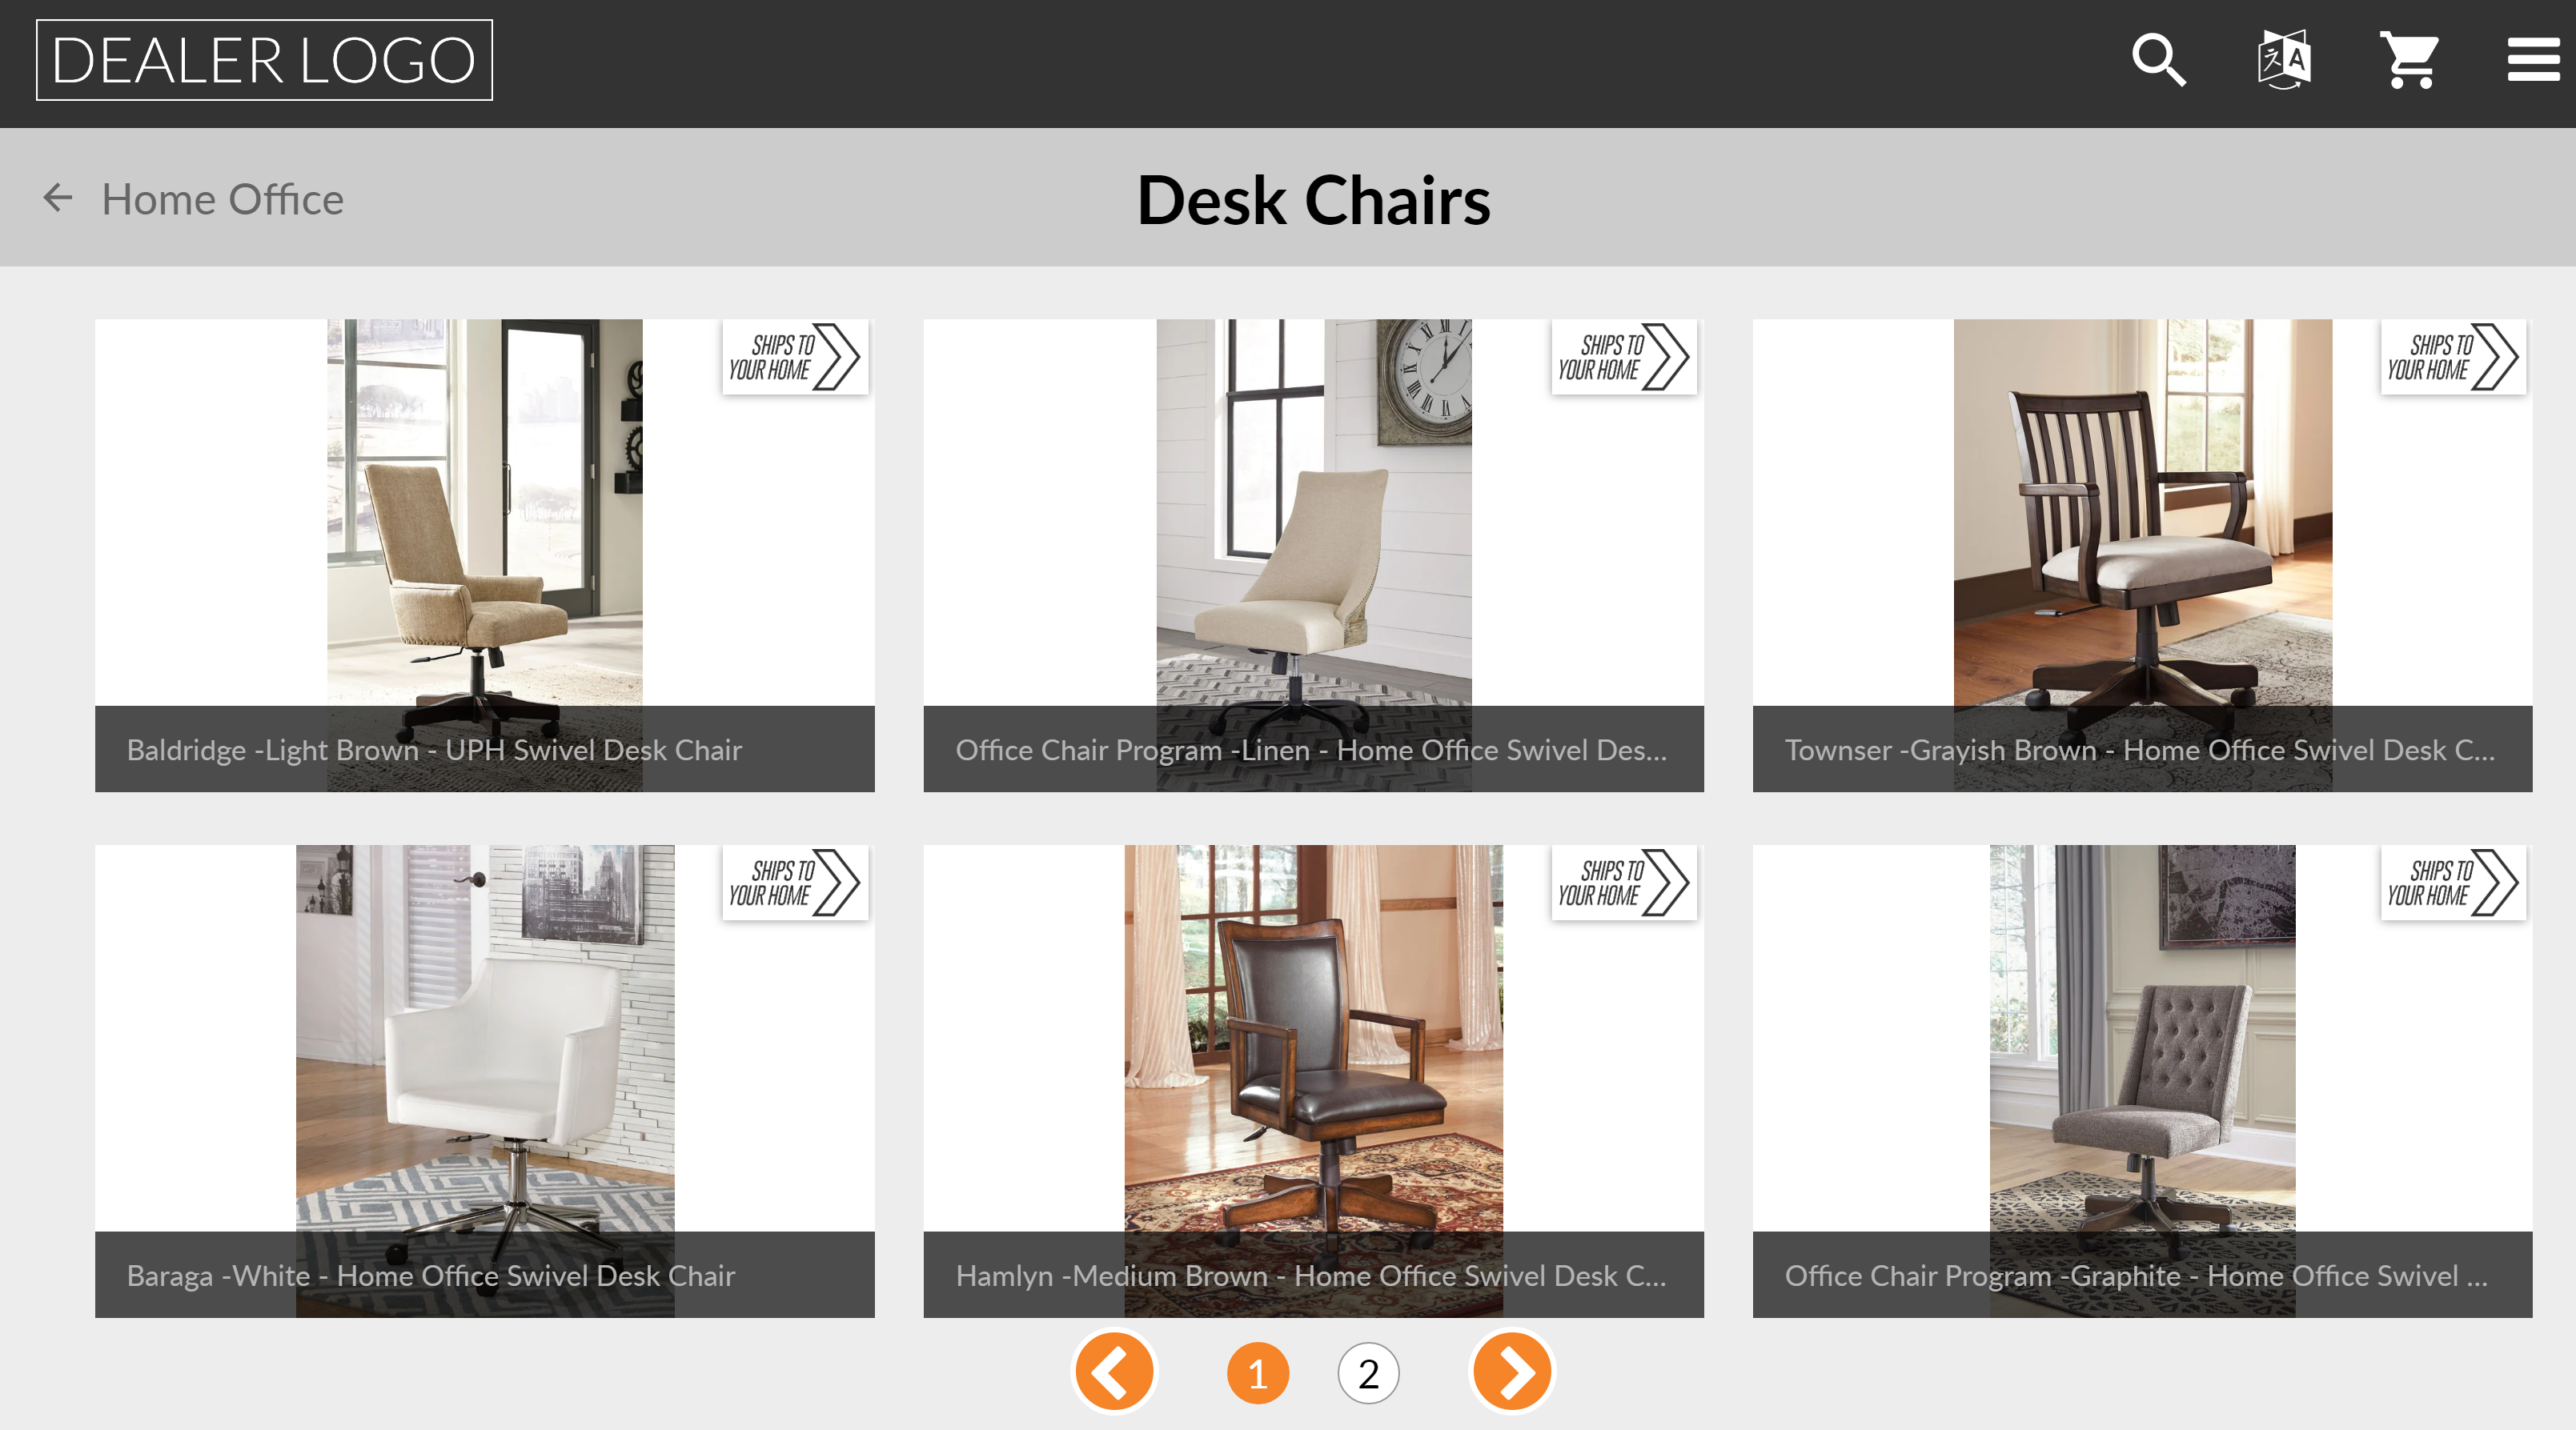
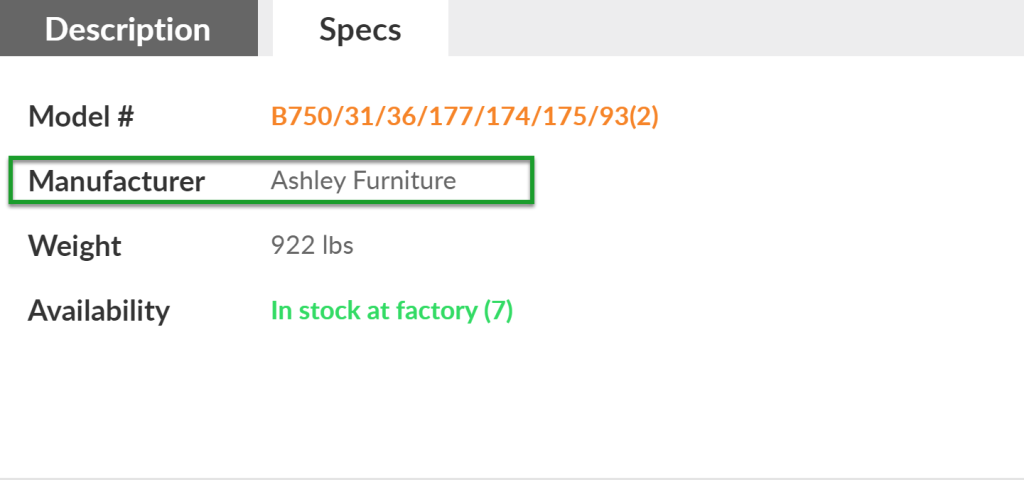
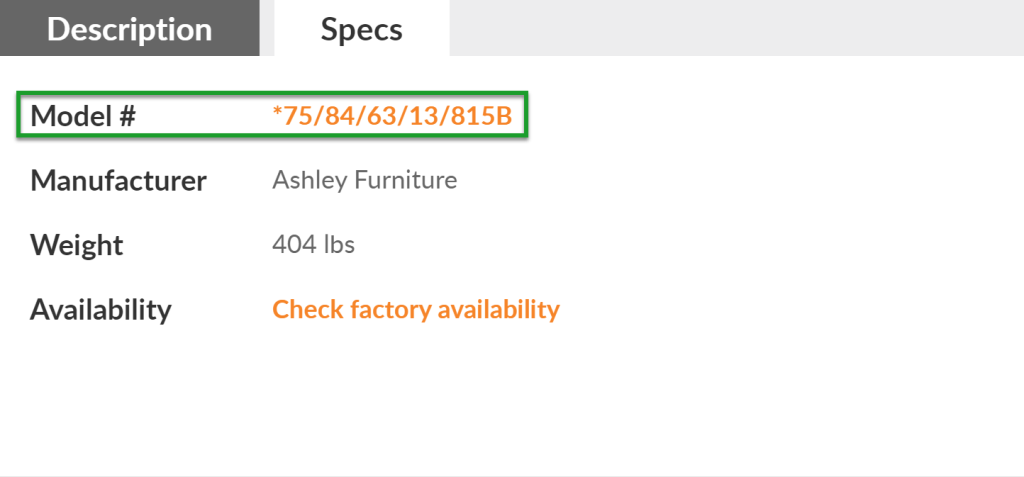
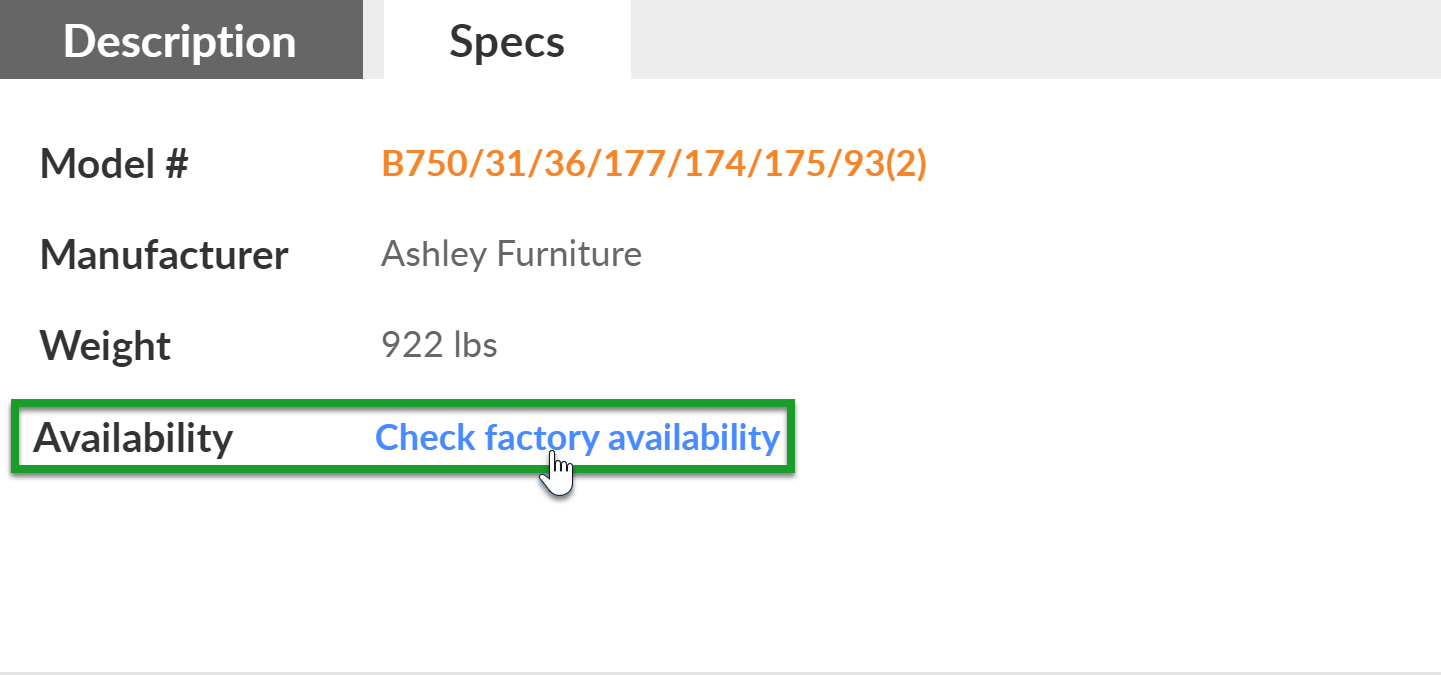
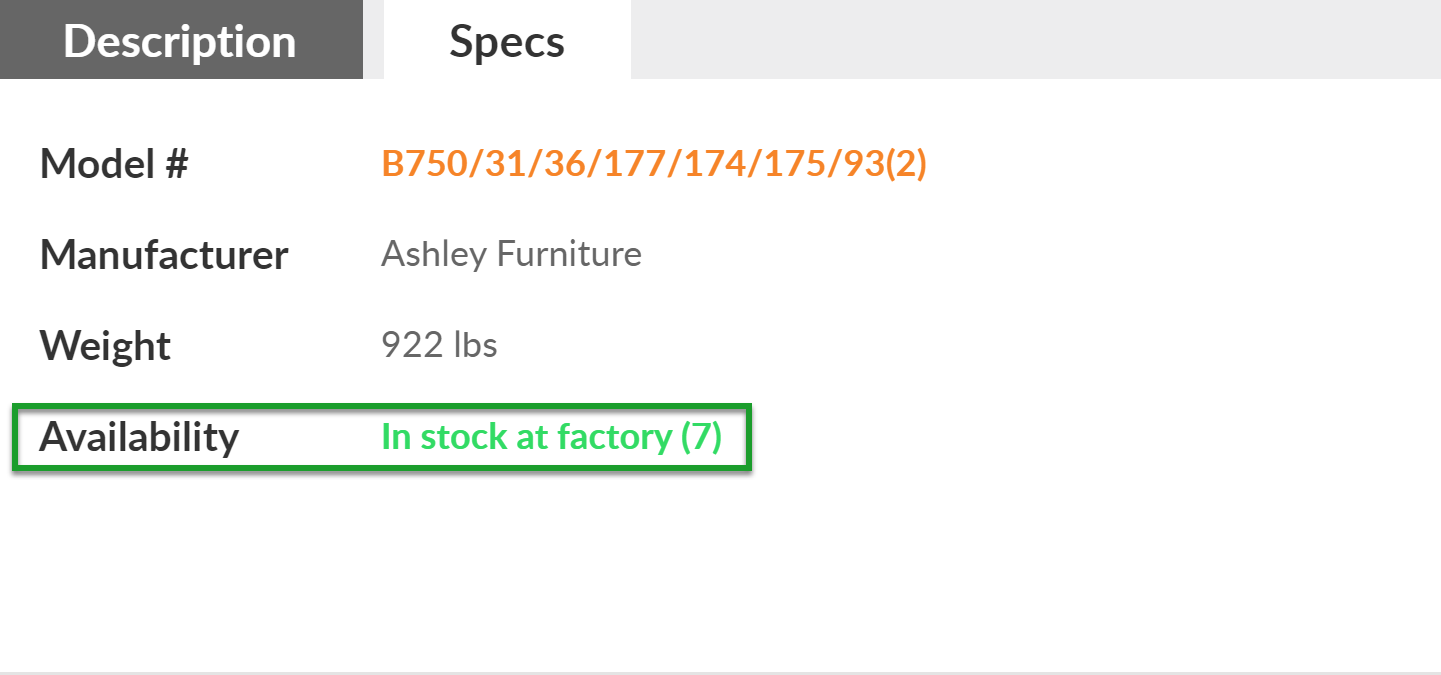
Inventory Availability - Enable Show Stock Amount to display available warehouse inventory quantities in the Catalog App.
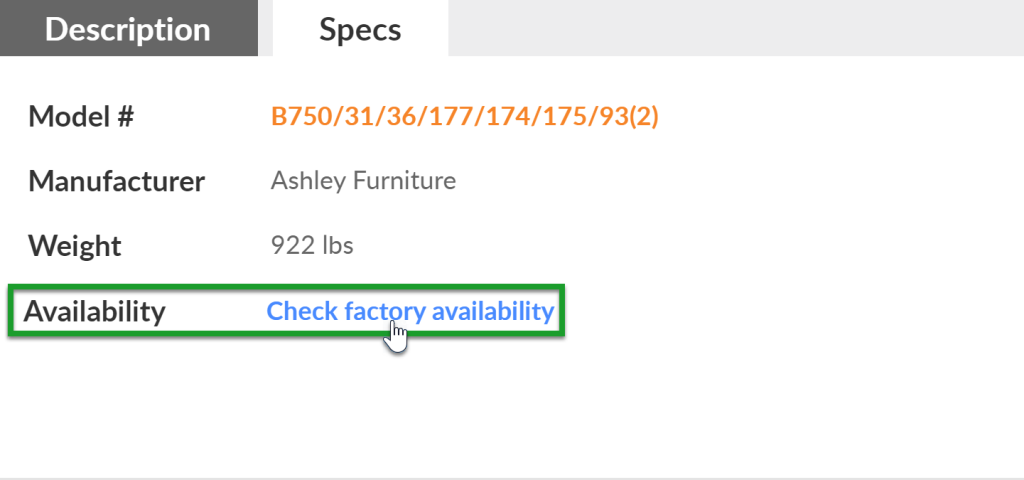
 Sign up for inventory availability and get real-time access to what's in stock at the warehouse right within your Catalog App.
- Kiosk Brand Display - Enable or disable this option to display or hide the manufacturer field in the Catalog App.
Enabling Kiosk Brand Display also allows customers to search through products by brand.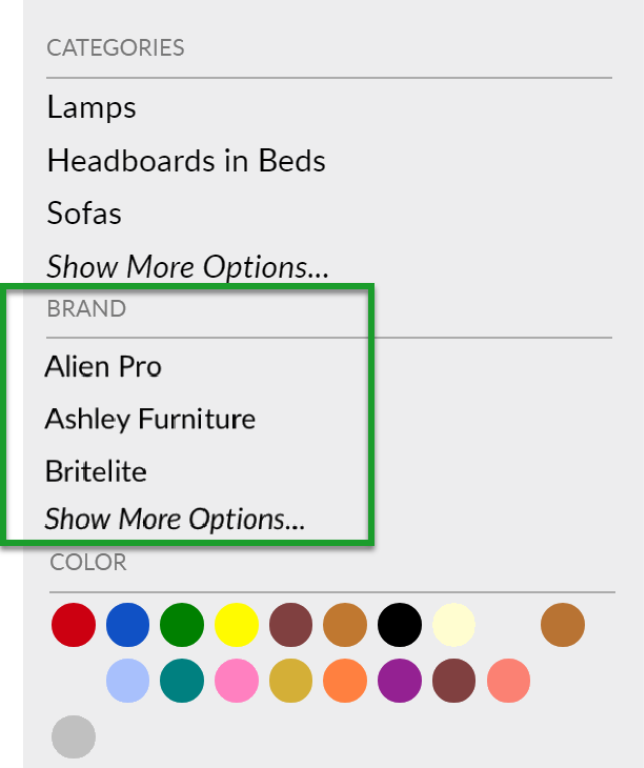
- Kiosk SKU Display - Enable or disable this option to display or hide SKUs in the Catalog App. Select Obfuscate to set the obfuscation method.
Kiosk SKU Obfuscation Method - Select an obfuscation method. Select Reverse and Append/Prepend to set an extra character.
Kiosk SKU Obfuscation Extra Character - Enter the desired extra character to append or prepend to your SKUs in the Catalog App.
- Product Sorting/Product Secondary Sorting - Product Sorting sets the primary sorting rule. Product Secondary Sorting determines how products are sorted further if two products are of the same price, name, or brand.


- Language - Select the default language for your Catalog App. Default language options include: Chinese Traditional, Chinese Simplified, Portuguese, Hindi, Russian, English, Spanish, and French. Customers can always change languages on the fly by clicking the Language icon in the Catalog App.

- Send email alert if device is offline 24+ hours - Set this option to On if you would like to receive an email alert for devices that remain consistently offline for more than 24 hours.

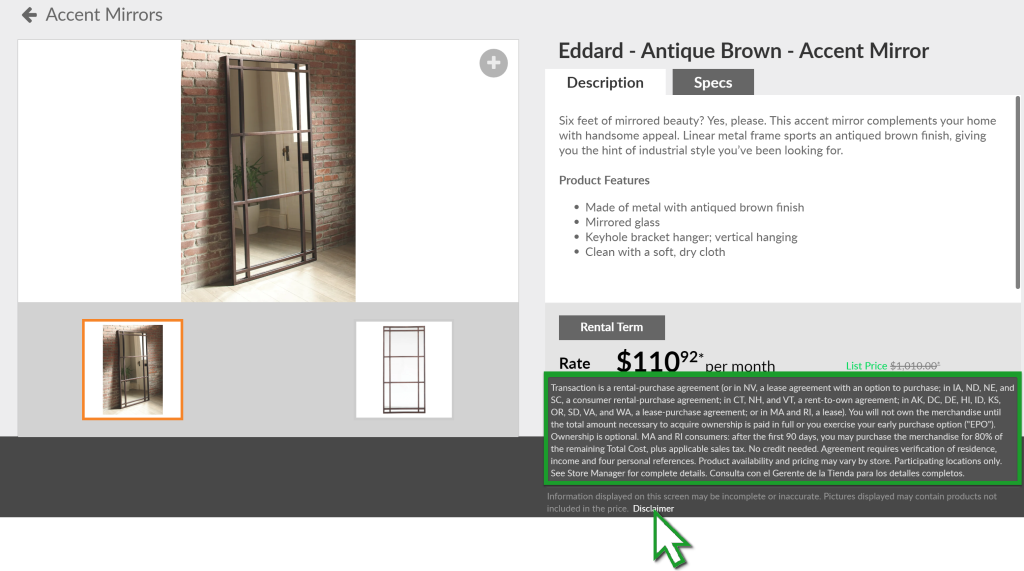
Disclaimers
Click Disclaimers to configure disclaimers for pricing, email & text, and email footers, and to set your legal name. This section offers you full control over the legal verbiage that appears in the Catalog App, text messages, and emails.
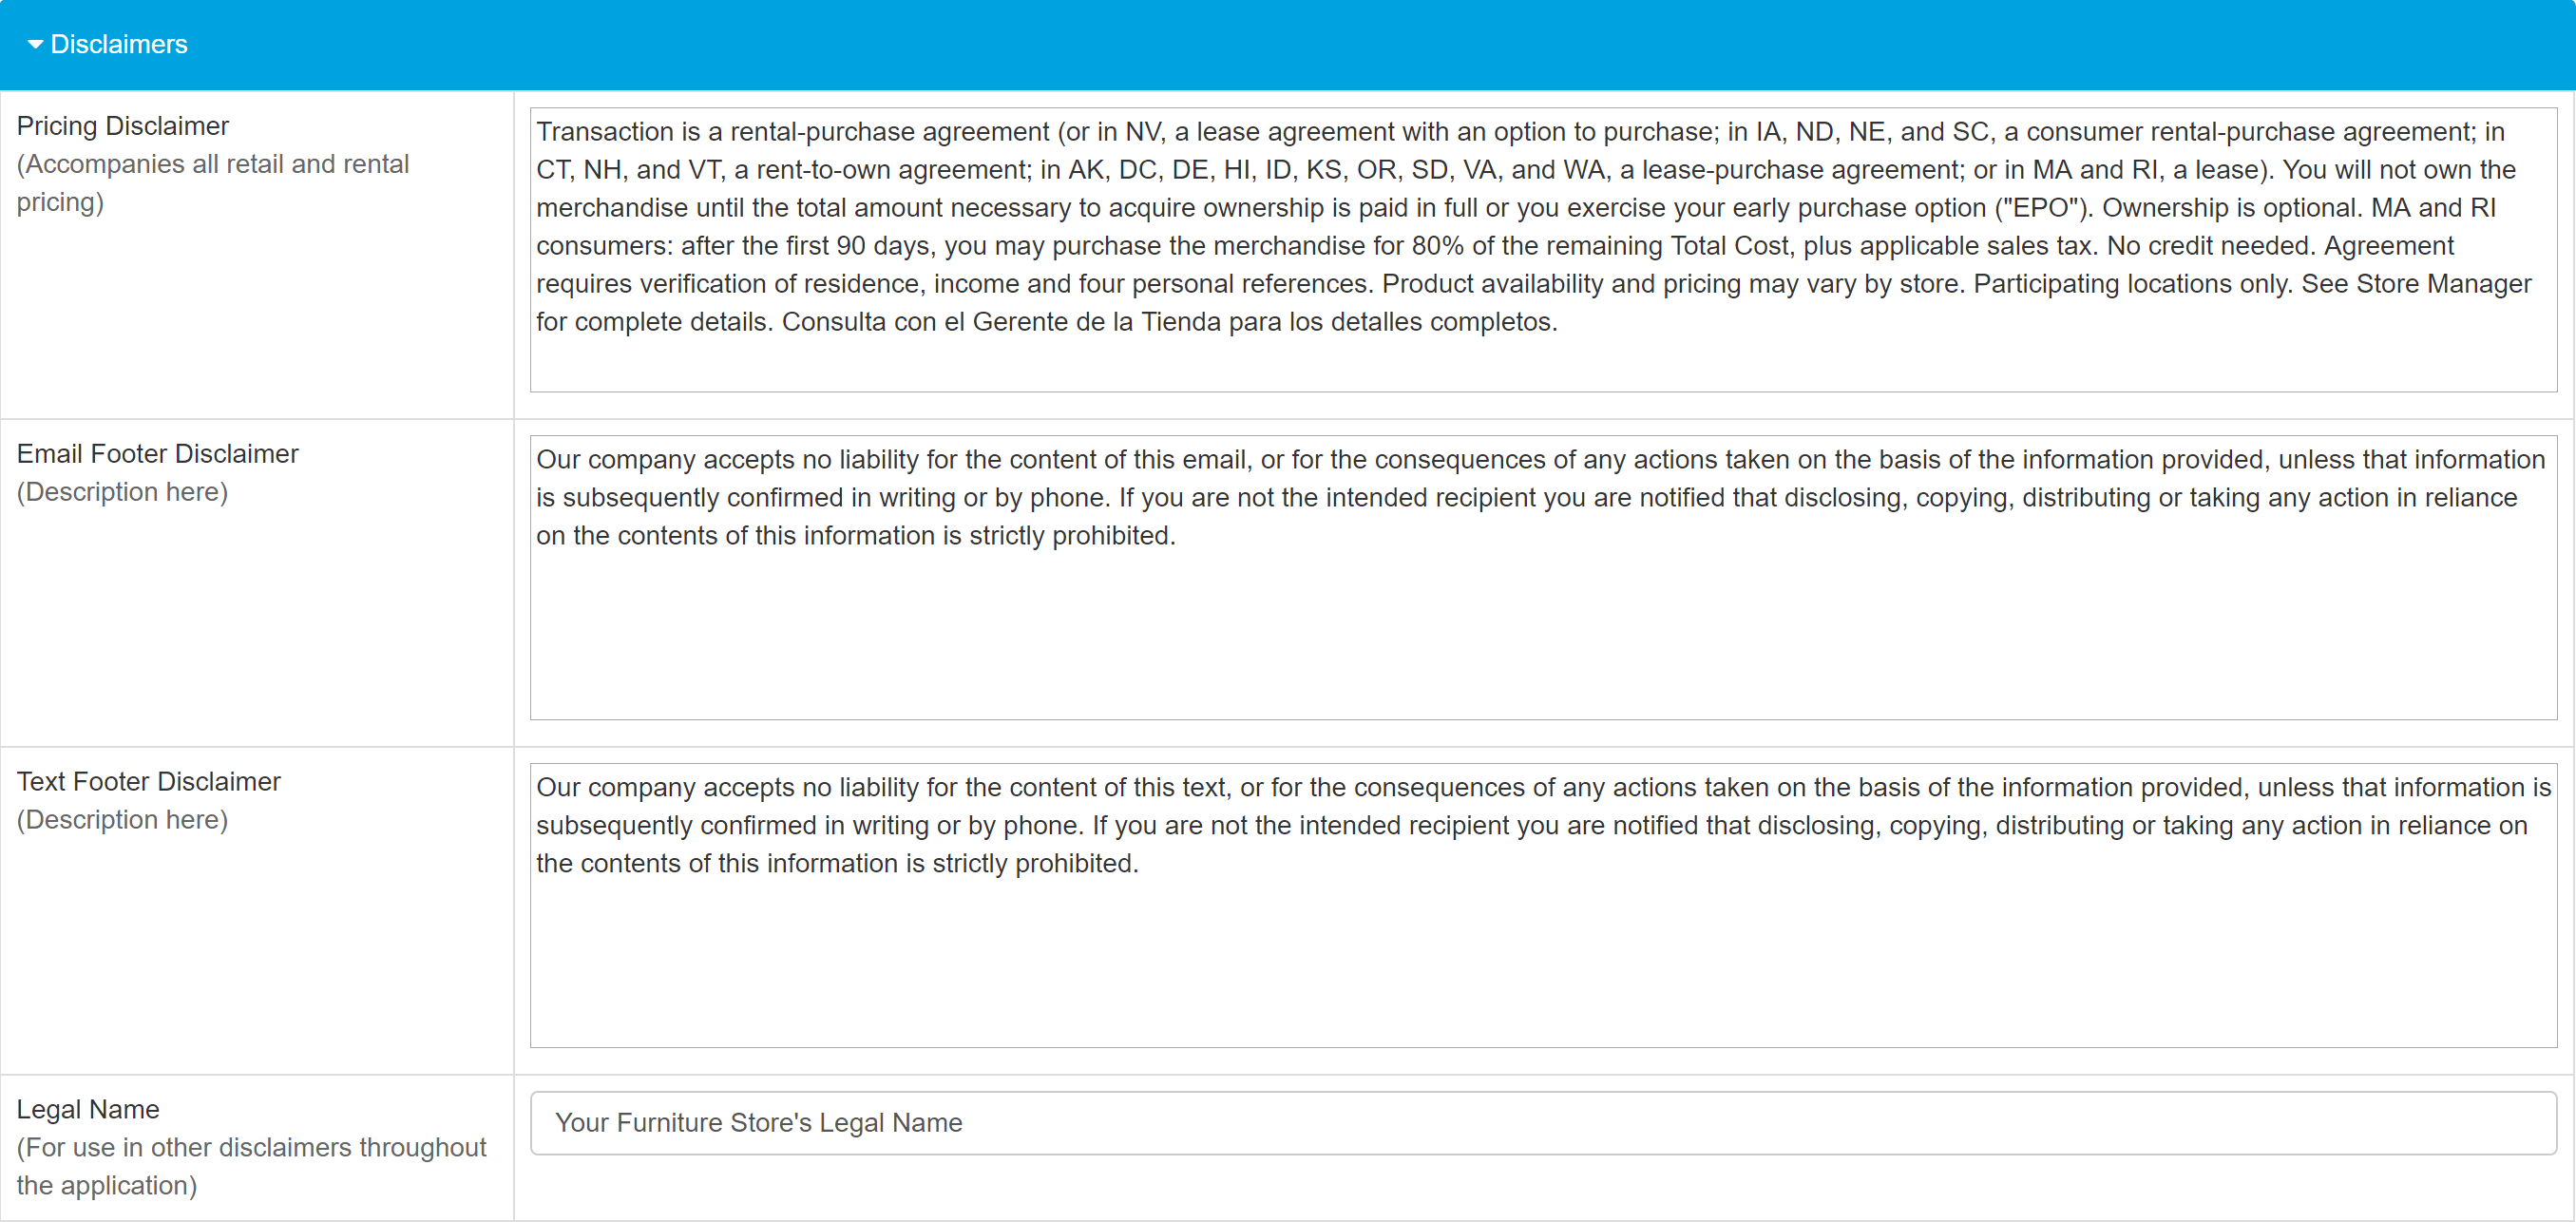
- Pricing Disclaimer - The pricing disclaimer appears on product description pages.
- Email/Text Footer Disclaimer - These disclaimers appear in emails sent from the Catalog App, and text messages that include photos (photos are only included when a user sends a single product).
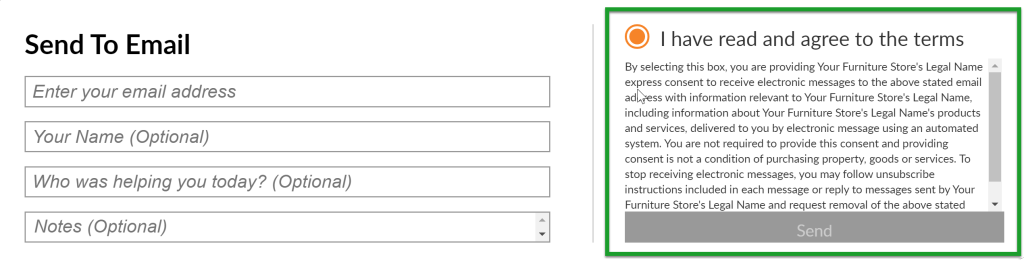
- Legal Name - The legal name you set here appears in the Email and Mobile consent verbiage displayed when a user elects Send to Email, Send to Mobile, or Start Order.

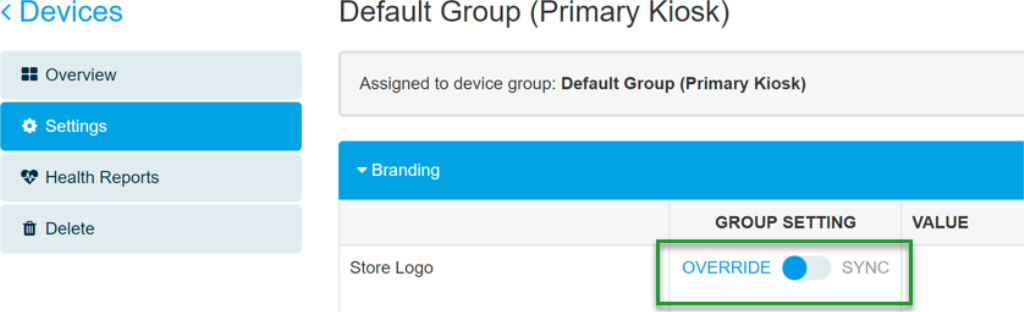
Override Device Group Settings
Each device connected to your account has its own Settings page that allows you to override any setting inherited from its device group. To override group settings on any individual device:
- Click the device name on the Devices screen.
- Click Settings, and then click the Override toggle. The Override toggle changes a setting for this device only. Settings toggled to Sync will inherit their values from their device group.

Change a Device's Group Assignment
To change which group a device is assigned to:
- Click the device name on the Devices screen.
- Select the desired device group from the Device Group drop-down.

Edit a Device or Device Group Name
To edit a Device or Device group name:
- Click the device name or device group Settings button on the Devices screen.
- click the pencil icon to the left of the name. This will place a box around the device or device group name, indicating it is now an editable field. Click anywhere within this box to edit.


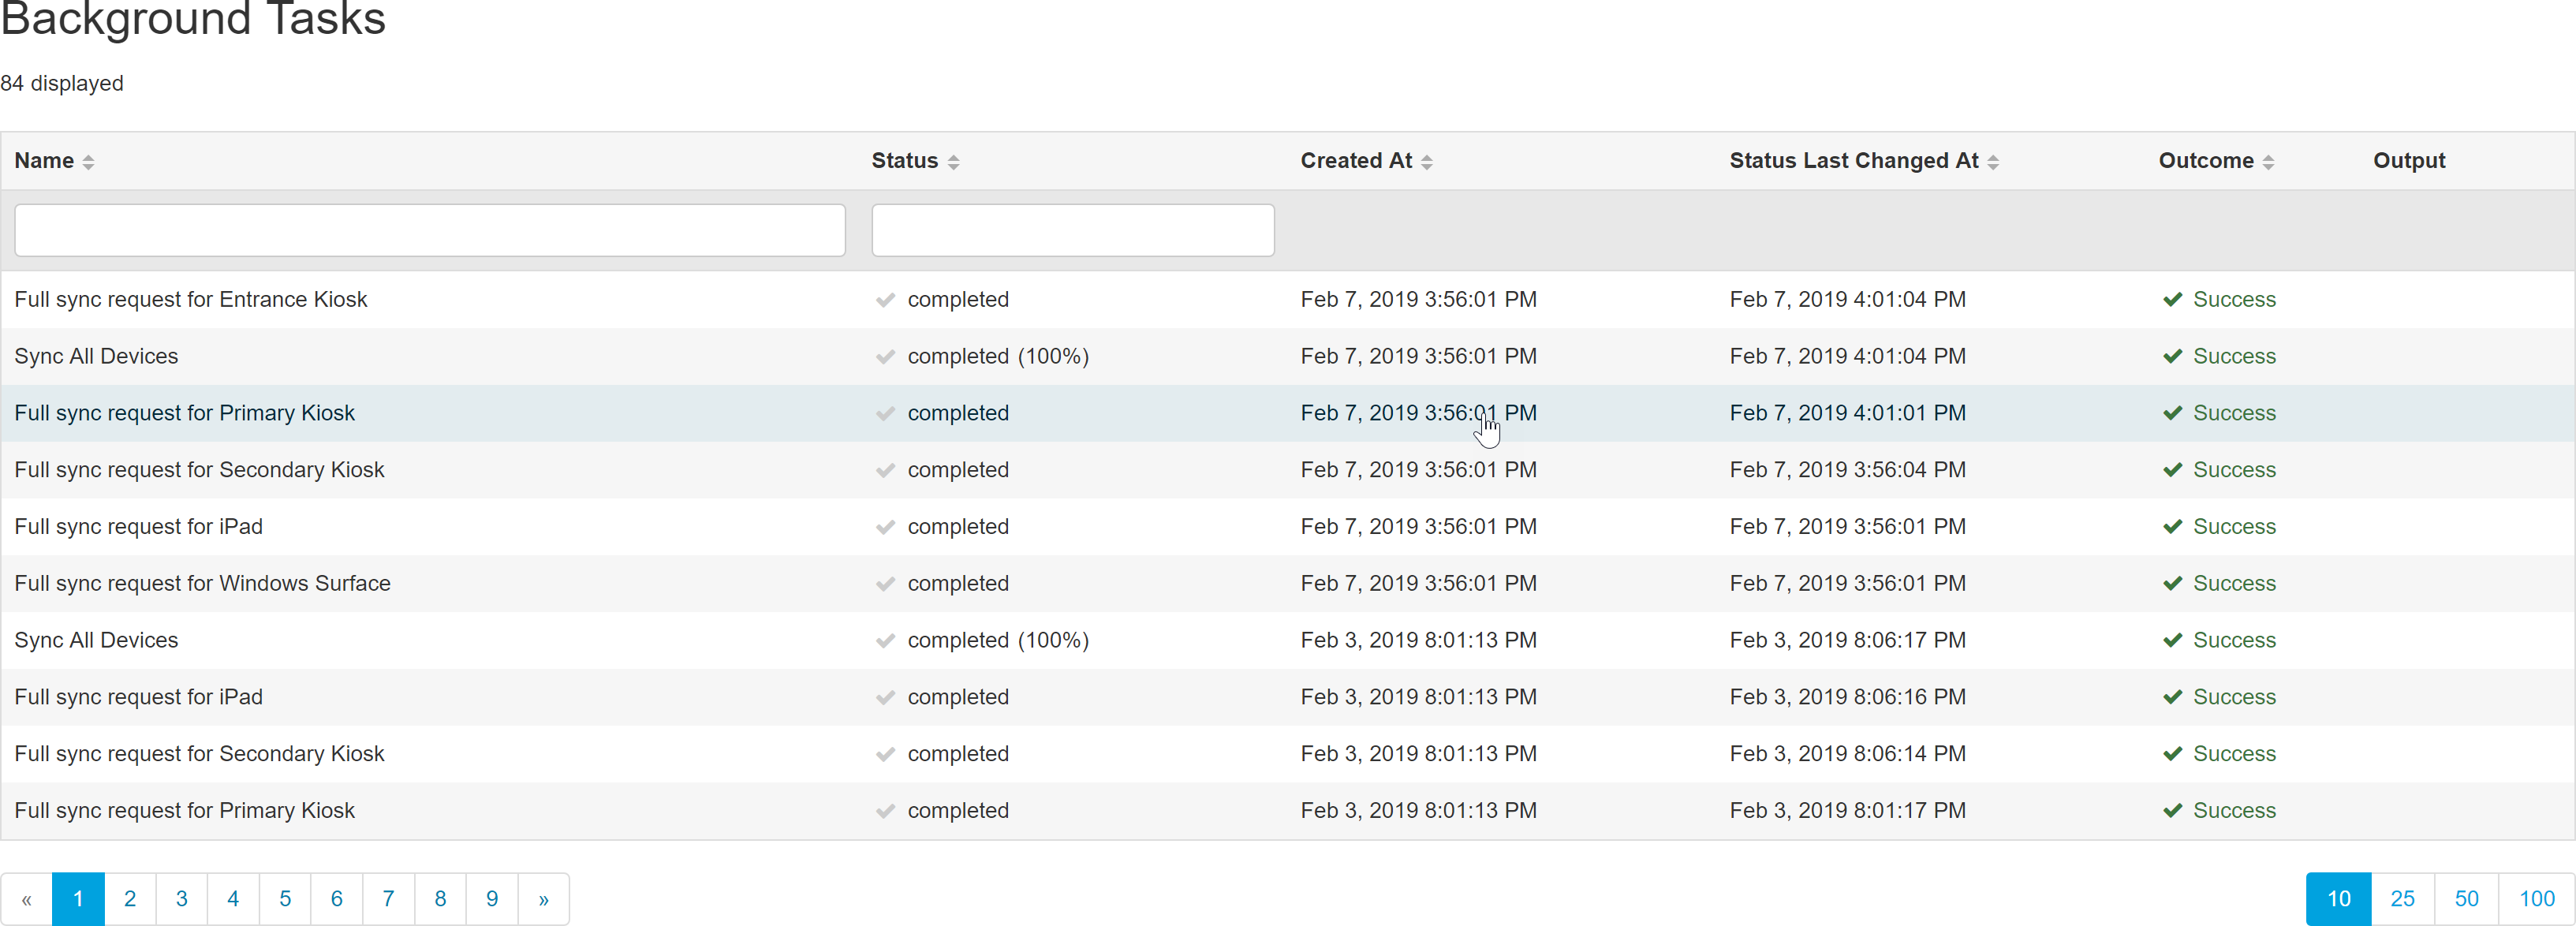
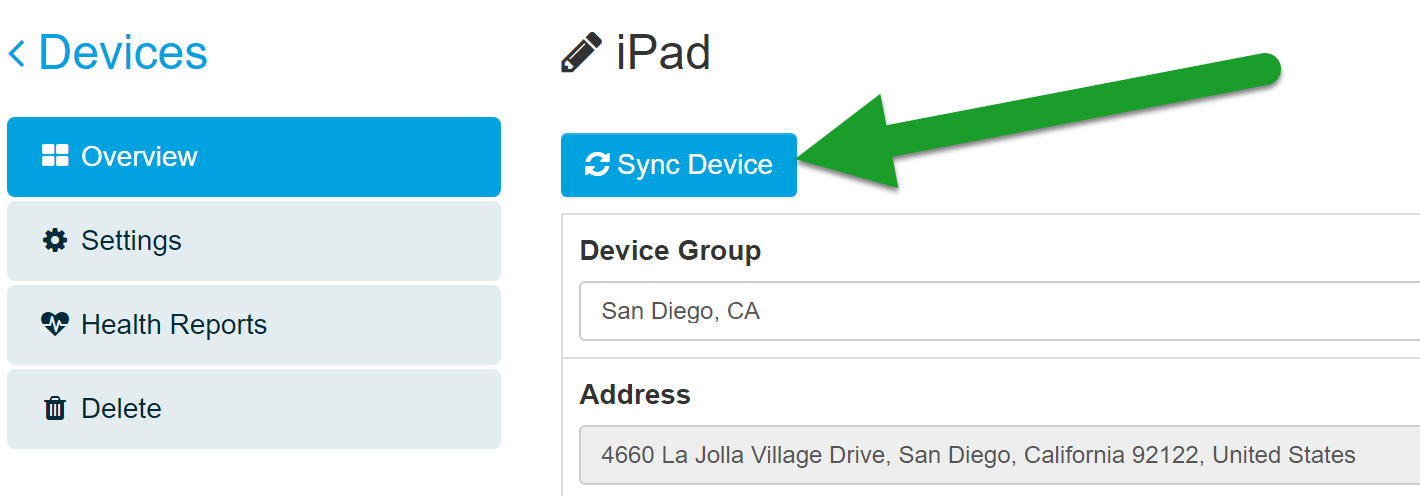
Sync Devices
The Catalog App syncs all of your online devices automatically once every 24 hours. If you would like to update your devices more immediately, you can opt to perform a manual sync.
To perform a manual sync:
- Sync All Devices - sync all devices using the Sync All Devices button on the Devices screen.
- Sync Individual Device - From the device management screen, click the device name on the Devices screen to open individual device settings, and click Sync Device.

Check the status of the sync process by clicking the sync icon in the top right of the screen. To view further details, click View Details.

The Sync Details screen contains a searchable history of all of your sync events. Use the fields at the top of the screen to filter your sync history by Name or Status.